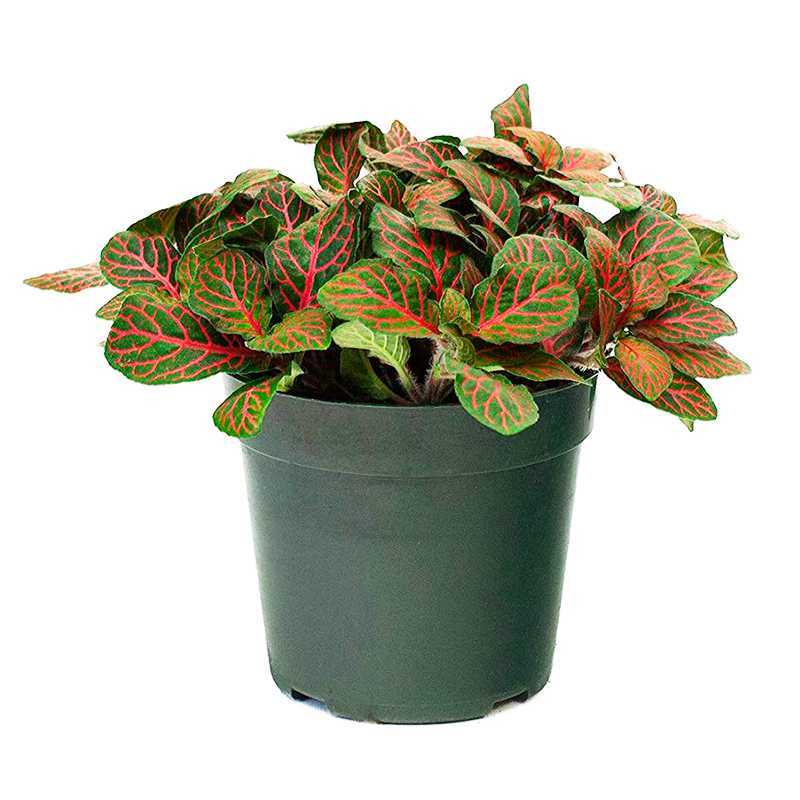
- Фиттония (Fittonia)
- Описание и особенности
- Требования к освещению
- Полив и влажность воздуха
- Температурный режим
- Почва и грунт
- Рекомендации по составу почвы при выращивании фиттонии:
- Удобрение
- Важно помнить:
- Размножение
- Виды фиттонии
- Фотографии фиттонии
- Проблемы и болезни
- 1. Пересушивание почвы
- 2. Переувлажнение почвы
- 3. Атака вредителей
- 4. Недостаток освещения
- 5. Температурные перепады
- Подходящие культуры
- Популярные сорта
- Фиттония аргиронитида
- Фиттония вершина
- Фиттония розовая
- Фиттония белая
- Вопрос-ответ:
- Для фиттонии необходимо яркое, но рассеянное освещение. Она предпочитает теплую и влажную атмосферу. Регулярное поливание и опрыскивание листвы помогут поддерживать нужный уровень влажности. Также рекомендуется регулярно удобрять растение и периодически обрезать его, чтобы сохранить компактную форму.
- Фиттония требует регулярного полива. Подкормка полезна, особенно летом, при активном росте растения. Чтобы не переувлажнить почву, следует поливать ее, когда верхний слой высохнет на 1-2 см. Летом поливают чаще, зимой уменьшают количество поливов.
- Фиттония предпочитает яркое, но рассеянное светлое освещение. Она может расти на северном окне или в тенистом углу комнаты. Однако следует избегать прямого солнечного света, так как он может вызвать ожоги на листьях растения. Оптимальная температура для фиттонии составляет 18-24 °C.
- Существует несколько видов фиттонии. Одним из самых популярных является Фиттония Красивая (Fittonia Verschaffeltii), у которой листья зеленого цвета с яркими красными, белыми или розовыми жилками. Есть также Фиттония Аргиронервная (Fittonia Argyroneura) с серебристыми жилками на зеленых листьях, а также Фиттония Беллой (Fittonia Bella) с интересными округлыми листьями и белыми жилками.
- Фиттонию можно размножать с помощью черенкования. Для этого нужно отрезать здоровый стебель с несколькими листьями и поместить его в воду или смесь торфа и песка до появления корней. Затем черенок можно пересадить в горшок с питательной почвой и обеспечить ему влажность и яркое, но рассеянное освещение. Размножение фиттонии также возможно делением куста.
Фиттония (Fittonia) — это род травянистых растений семейства акацевых (Acanthaceae). Они известны своими красивыми листьями с яркими жилками, которые создают впечатление картины или мозаики на поверхности листа. Фиттония происходит из тропических лесов Южной и Центральной Америки, где они растут на земле, на пнях или на других растениях в качестве эпифитов.
Это небольшие растения, которые обычно не превышают 15 см в высоту. В зависимости от вида, у них может быть разный цвет и форма листьев — от зеленого с яркими красными или белыми жилками до фиолетовых или серебристых оттенков. Фиттония предпочитает яркий, но рассеянный свет и высокую влажность. Они отлично подходят для выращивания в горшках или для украшения балконов и террас.
Уход за фиттонией требует некоторого внимания. Они нуждаются в регулярном поливе, но не перенесут затопления или пересыхания почвы. Также важно поддерживать высокую влажность окружающего воздуха, например, с помощью распылителя воды. Растение рекомендуется регулярно подкармливать универсальным удобрением для комнатных растений.
Фиттония (Fittonia)
Фиттония, также известная как нервянка, является популярным комнатным растением благодаря своим ярким и красочным листьям. Это маленькое и компактное растение привлекает внимание своими ветвистыми стеблями и заостренными с обеих сторон листьями.
Фиттония относится к семейству акацевых и встречается в тропических лесах Южной Америки. Она приобрела большую популярность благодаря своей эффектной окраске листьев, которая может быть различной — от ярко-розовых до зеленых с серебристыми узорами.
Уход за фиттонией не требует особых навыков и знаний. Растение предпочитает яркое, но рассеянное освещение, поэтому его лучше разместить на окне с восточной или северной стороны. Также важно следить за уровнем влажности в помещении — фиттония предпочитает повышенную влажность воздуха.
Важным условием для успешного выращивания фиттонии является регулярный полив. Земля в горшке должна быть постоянно влажной, но не застоявшейся. При поливе следует избегать заливания растения и использовать мягкую или отстоянную воду.
Описание и особенности
Фиттония (Fittonia) — изысканные и декоративные комнатные растения, они относятся к семейству акациевых. Их родина – заросли тропических лесов в Боливии, Перу, Колумбии. Фиттония распространена в Америке, Европе, Азии и Океании.
Основная особенность фиттонии – это красиво окрашенные жилки на листьях. У нее множество разных сортов с разнообразной расцветкой. Но помимо этого, интересны и другие ее черты:
- Малые размеры. Фиттония компактна и компактна. Ее высота разной, но в среднем она составляет около 15-20 см.
- Мясистые стебли. У растения мясистые стебли и угловатые се- редины листьев.
- Корни. У фиттонии корни мощные, они залегают близко от поверхности, исходя от каждого комка.
- Цветки. Фиттония цветет редко. Усыходит более декоративна листьями.
Такие черты позволяют использовать эти растения для одиночных и групповых композиций в дизайне интерьера. Благодаря своим небольшим размерам и разнообразной окраске листьев фиттония стала одним из самых популярных растений домашнего цветника.
Требования к освещению
Фиттония предпочитает яркое, но разбитое освещение. Она не переносит прямые солнечные лучи и может получить ожоги на листьях в результате длительной экспозиции на прямом солнце. Недостаток освещения также может негативно сказаться на росте и внешнем виде растения.
Идеальным местом для фиттонии будет восточное или западное окно, где она получит достаточно яркого, но рассеянного света. Если вы размещаете растение в северном окне, то, возможно, потребуется использование искусственного освещения, чтобы обеспечить нужный уровень света.
Важно помнить, что фиттония является тропическим растением и имеет привычку расти на затененных местах в дикой природе. Поэтому ей необходимо обеспечить достаточное количество света, чтобы она могла выполнять фотосинтез и развиваться нормально.
Полив и влажность воздуха
Фиттония — растение, которое предпочитает умеренное количество влаги. Переувлажнение может привести к гниению корней и заболеванию растения. Но также она не переносит сухость, поэтому нуждается в достаточной влажности воздуха, особенно в жаркое время года.
Полив фиттонии следует производить регулярно, но умеренно. Важно, чтобы верхний слой грунта подсыхал перед каждым поливом. Для полива лучше использовать мягкую воду при комнатной температуре, чтобы избежать переохлаждения или перегрева корней.
Оптимальная влажность воздуха для фиттонии составляет около 60-70%. Для поддержания такого уровня можно использовать различные методы. Например, можно распылять воду вокруг растения или использовать увлажнитель воздуха. Также можно разместить горшок с фиттонией на поддон с влажным гравием или мохом.
Температурный режим
Fittonia является растением, которое предпочитает теплый климат. Оптимальная температура для него составляет 20-25 градусов Цельсия. При этой температуре фиттония будет расти и развиваться наилучшим образом.
Важно помнить, что Fittonia не выносит резких перепадов температур. Поэтому не рекомендуется размещать растение рядом с кондиционером или обогревателем. Также следует избегать прямых солнечных лучей, поскольку они могут вызвать ожоги на листьях фиттонии.
Зимой, когда температура снижается, рекомендуется установить растение в более прохладном месте, при температуре около 15 градусов Цельсия. Это поможет растению войти в состояние покоя и подготовиться к активному росту весной.
Почва и грунт
Фиттония предпочитает легкую, рыхлую и плодородную почву. Она предпочитает кислую или слабокислую среду, поэтому идеальным вариантом для выращивания растения будет смесь из перегноя, кокосового волокна и торфа. Такая почва обеспечит хорошую воздухопроницаемость, сохранит оптимальную влажность и не будет задерживать избыточную влагу.
При несоблюдении требований к почве заболеваемость растения может возрасти, а рост замедлиться. Для предотвращения этого регулярно проверяйте влажность почвы, а также заменяйте грунт раз в два года, чтобы сохранить его плодородие.
Рекомендации по составу почвы при выращивании фиттонии:
- Перегной — 1 часть
- Кокосовое волокно — 2 части
- Торф — 1 часть
Кроме того, нужно учесть, что растение не переносит засушливую почву, поэтому регулярно поддерживайте умеренную влажность почвы. Можно использовать поддоны или подставки с влагопоглотителями, чтобы избежать стоячей воды, которая может вызвать гниение корней.
Удобрение
Фиттония является растением, которому требуется регулярное удобрение для обеспечения здорового роста и яркого окраса листвы. Удобряйте растение каждые 2-3 недели в период активного роста с помощью универсального жидкого удобрения для комнатных растений. Рекомендуется использовать половину рекомендуемой на упаковке дозы, чтобы избежать переувлажнения почвы и перегрузки растения питательными веществами.
Оптимальным вариантом для удобрения фиттонии является использование органических удобрений, таких как компост или перегной. Для этого можно добавить небольшое количество органического удобрения в верхний слой почвы вокруг растения и аккуратно перемешать его с почвой. Благодаря этому растение получит дополнительные питательные вещества.
Удобрение фиттонии также можно проводить с помощью мульчирования. Для этого достаточно нанести тонкий слой мульчи на поверхность почвы в горшке. Это поможет удержать влагу, подавляет рост сорняков и обеспечит почву дополнительными питательными веществами.
Важно помнить:
- Не переувлажняйте почву при удобрении, чтобы избежать гниения корней.
- Следите за реакцией растения на удобрение. Если появляются признаки перегрузки питательными веществами, уменьшите дозировку удобрения.
- Удобряйте фиттонию только в период активного роста — с весны до осени. Зимой растение заходит в покой и не требует активного удобрения.
Размножение
Фиттония — растение, которое можно размножать разными способами. Один из самых популярных способов размножения — черенкование. Для этого необходимо отрезать верхний частью стебля с несколькими листьями и поставить его в воду или подложить в субстрат. Через некоторое время появятся корни, а затем можно пересадить растение в грунт.
Еще один способ размножения фиттонии — деление куста. Для этого необходимо предварительно выращивать растение в более объемном горшке, чтобы у корней было достаточно места для размножения. После того как куст достигнет нужного размера, его можно аккуратно разделить на несколько частей и каждую из них пересадить в отдельные горшки с подготовленным грунтом.
Также фиттонию можно размножать семенами, но это более сложный и продолжительный процесс. Семена собирают после цветения растения и высевают их в подходящий субстрат. Для получения рассады необходимо создать оптимальные условия: постоянная температура, влажность и яркий свет. После появления сеянцев их можно пересаживать в отдельные горшочки, чтобы они продолжили свое развитие.
Важно помнить, что для успешного размножения фиттонии необходимо создать оптимальные условия: теплая комнатная температура, высокая влажность воздуха и яркий рассеянный свет. Также растение нуждается в регулярном поливе и удобрении.
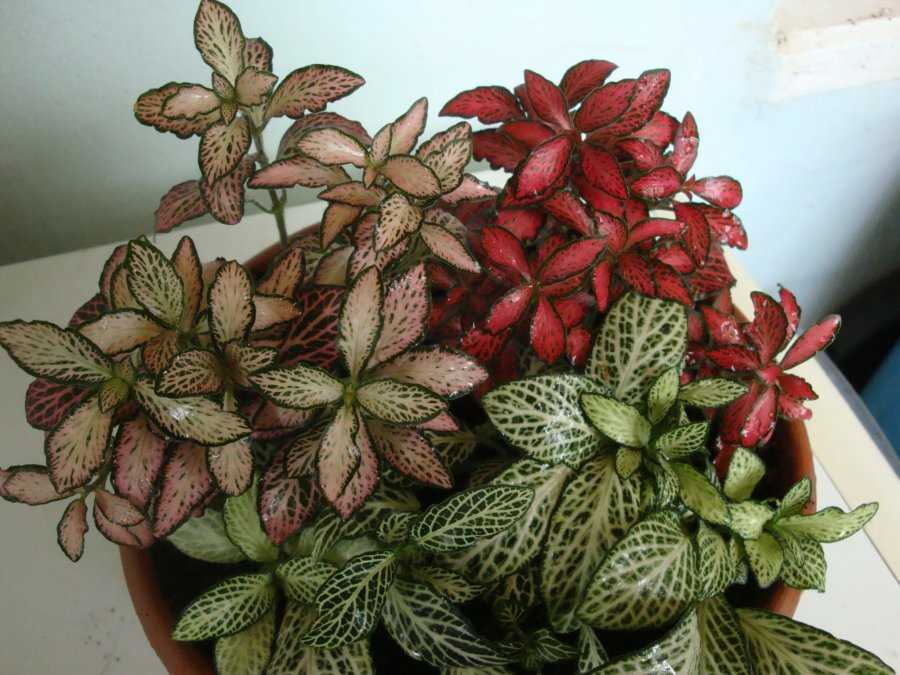
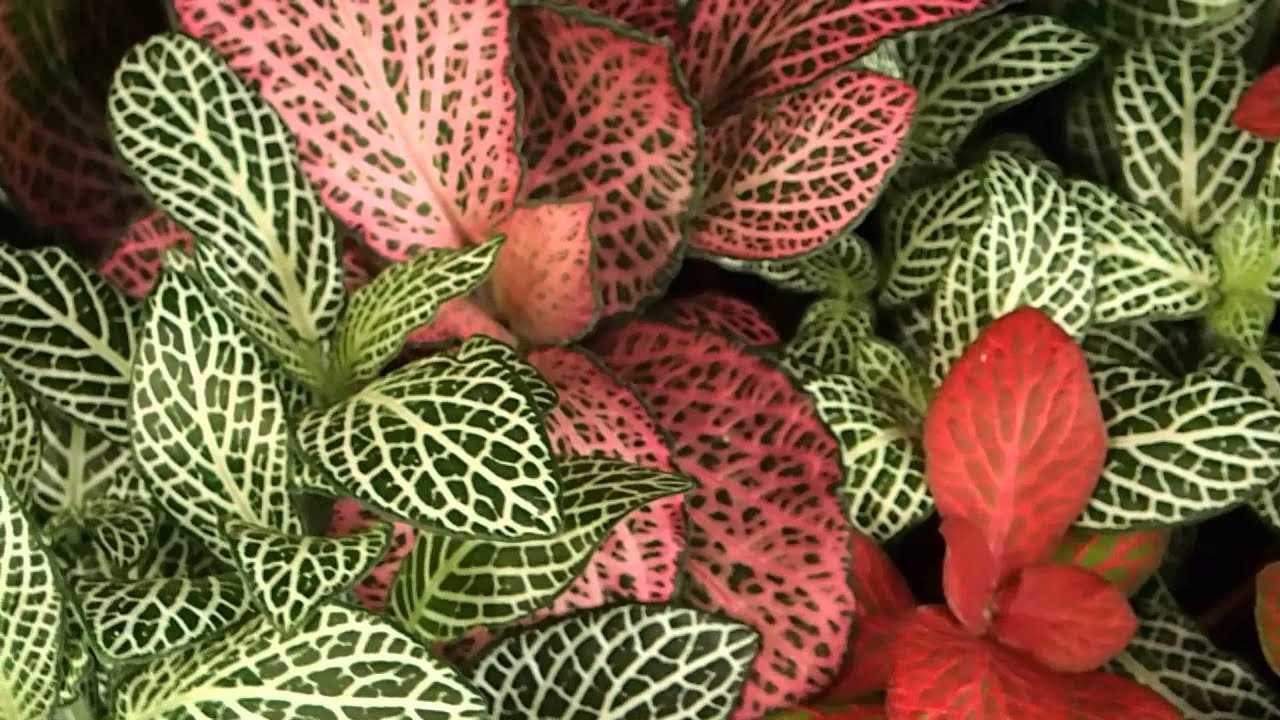
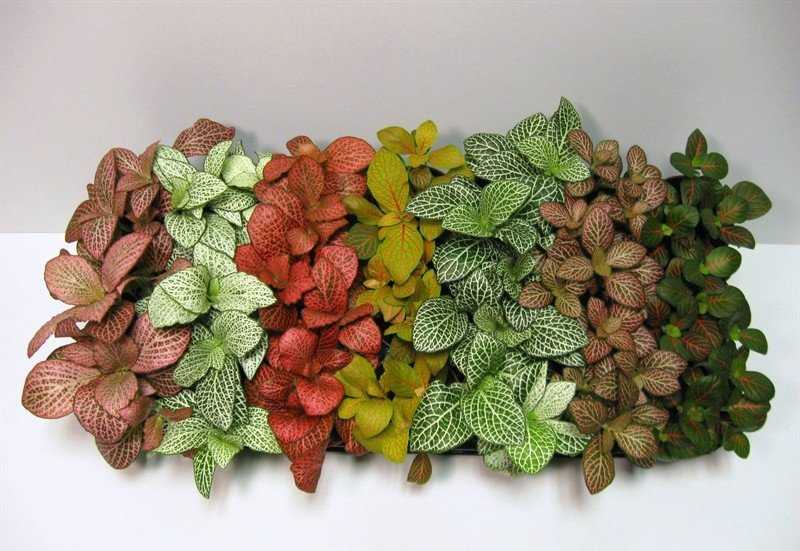
Виды фиттонии
В мире существует около 30 видов растений фиттония. Они отличаются по форме и окраске листьев, а также по размеру и форме куста.
Фиттония желательная (Fittonia verschaffeltii)
Этот вид фиттонии известен своими яркими и контрастными окрасками листьев. Листочки имеют зеленую основу с яркими жилками, которые могут быть белыми, красными или розовыми. Растение обладает кустистым характером роста и может достигать высоты до 30 см.
Фиттония серебристая (Fittonia argyroneura)
Так стоп!!! Вы всё ещё не подписаны на наши каналы в Телеграмм и Дзен? Посмотрите: ТГ - (@historyfantasydetectivechat) и Дзен (https://dzen.ru/myshortsstorys)
У этого вида фиттонии листья имеют серебристую окраску и ярко выраженные темно-зеленые жилки, которые создают привлекательный контраст. Растение имеет компактный размер и довольно раскидистую крону.
Фиттония белая (Fittonia albivenis)
Этот вид фиттонии отличается своей белоснежной окраской листьев. Он имеет зеленую основу, усыпанную белыми пятнами или полосами. Растение обладает компактным размером, но в то же время может достигать впечатляющей высоты в условиях благоприятного ухода.
Фиттония красная (Fittonia red vein)
Этот вид фиттонии славится своими ярко-красными жилками, которые прекрасно контрастируют с зеленым фоном листьев. Растение образует плотный куст и имеет небольшие, округлые листья. Оно отлично смотрится как в саду, так и в интерьерных композициях.
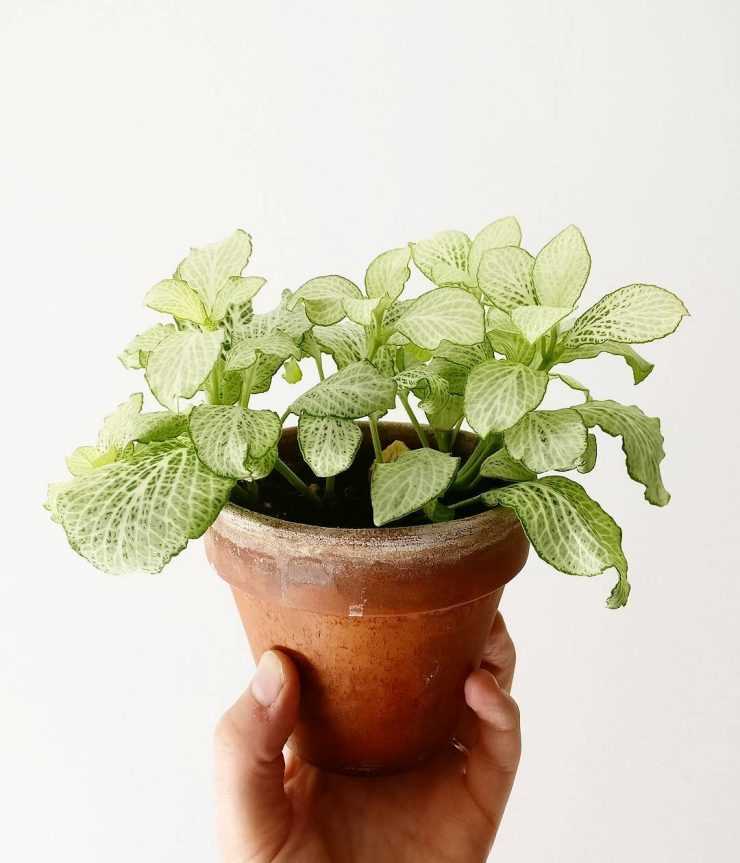
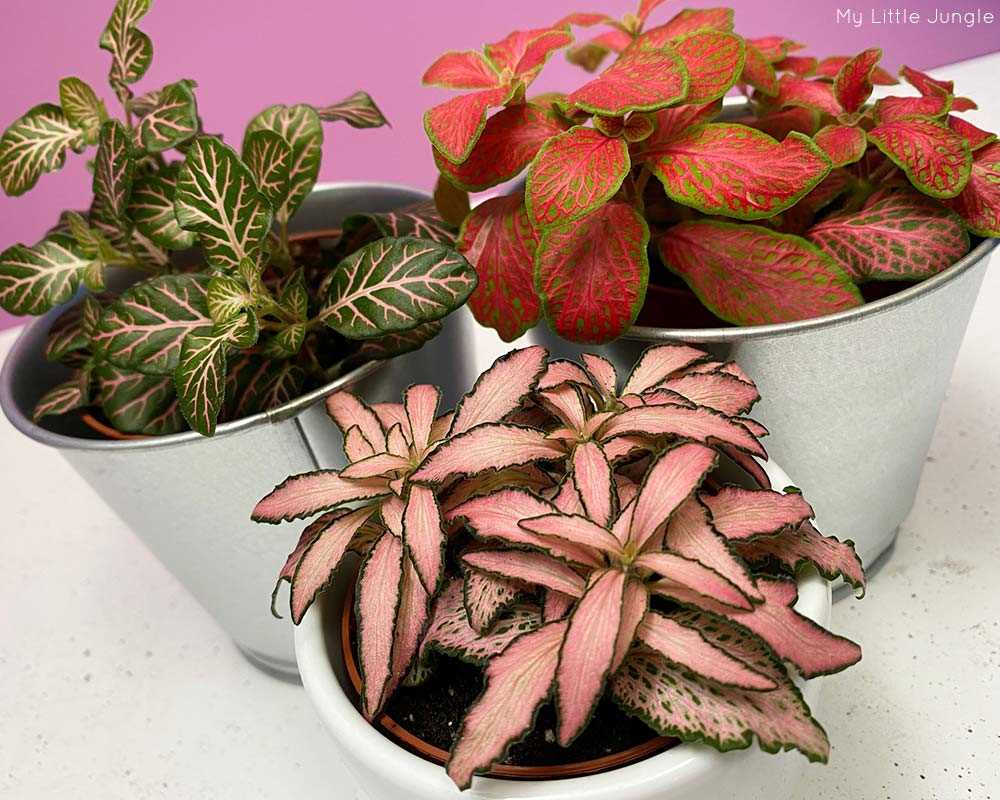
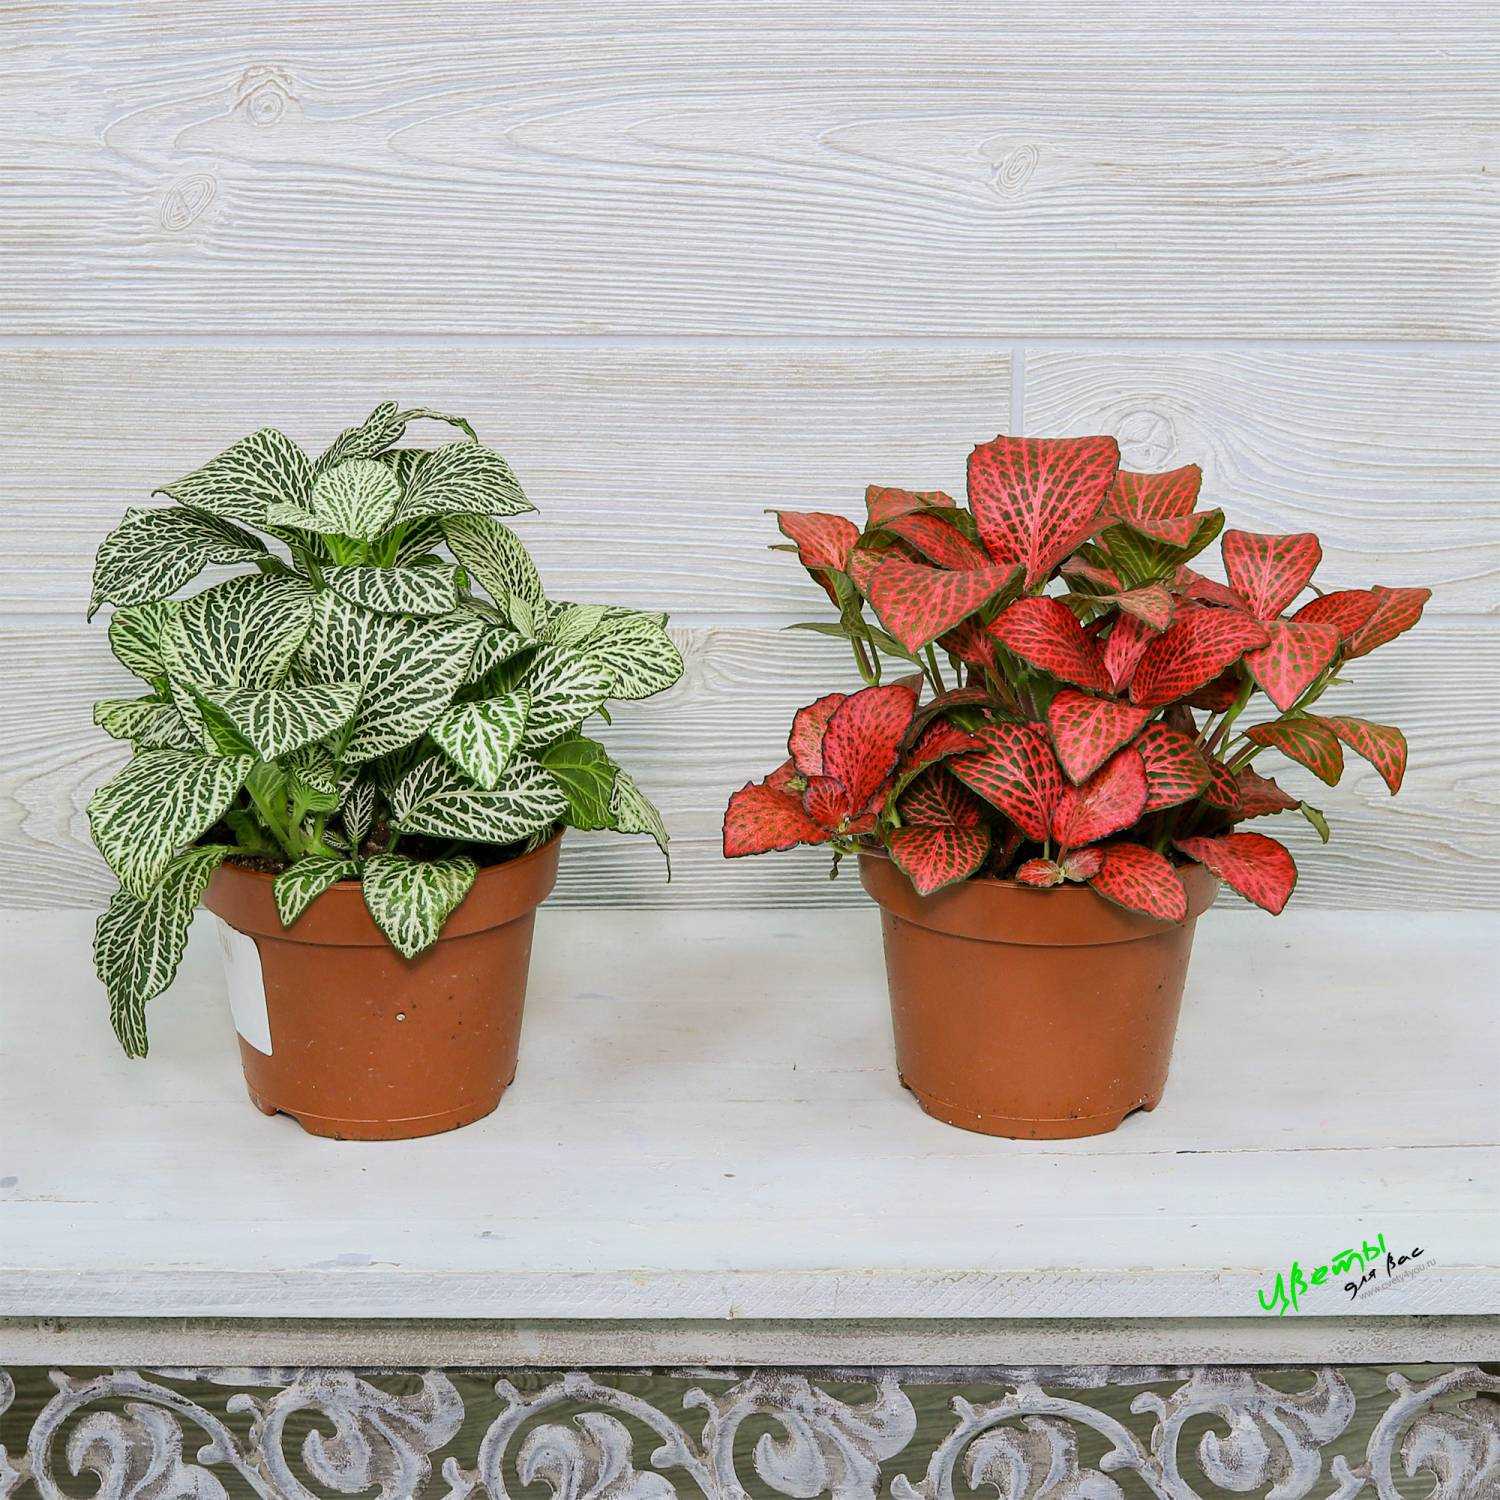
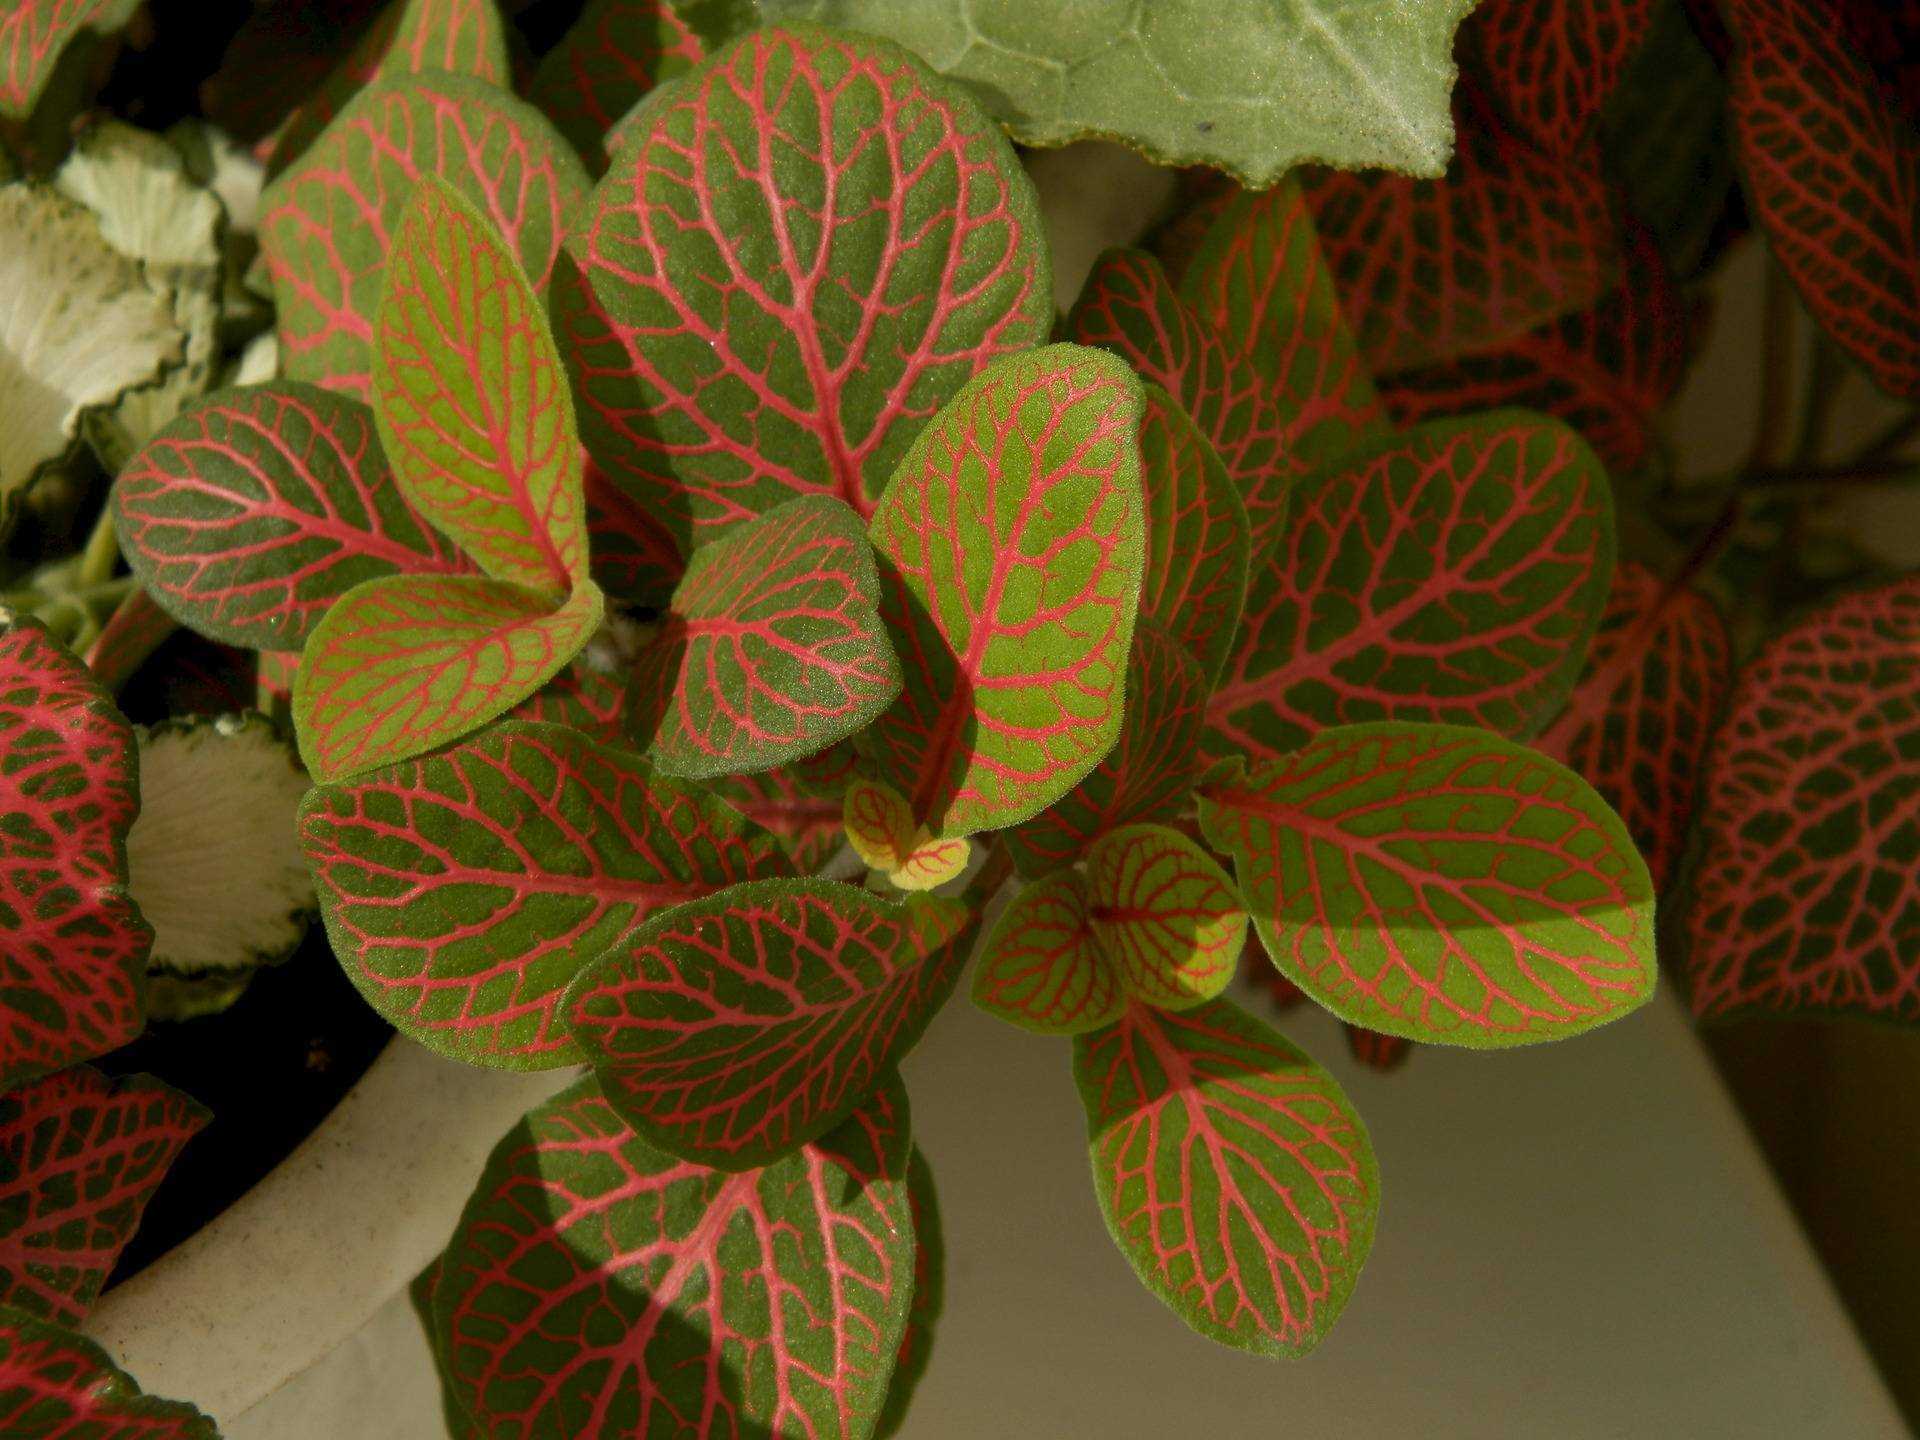
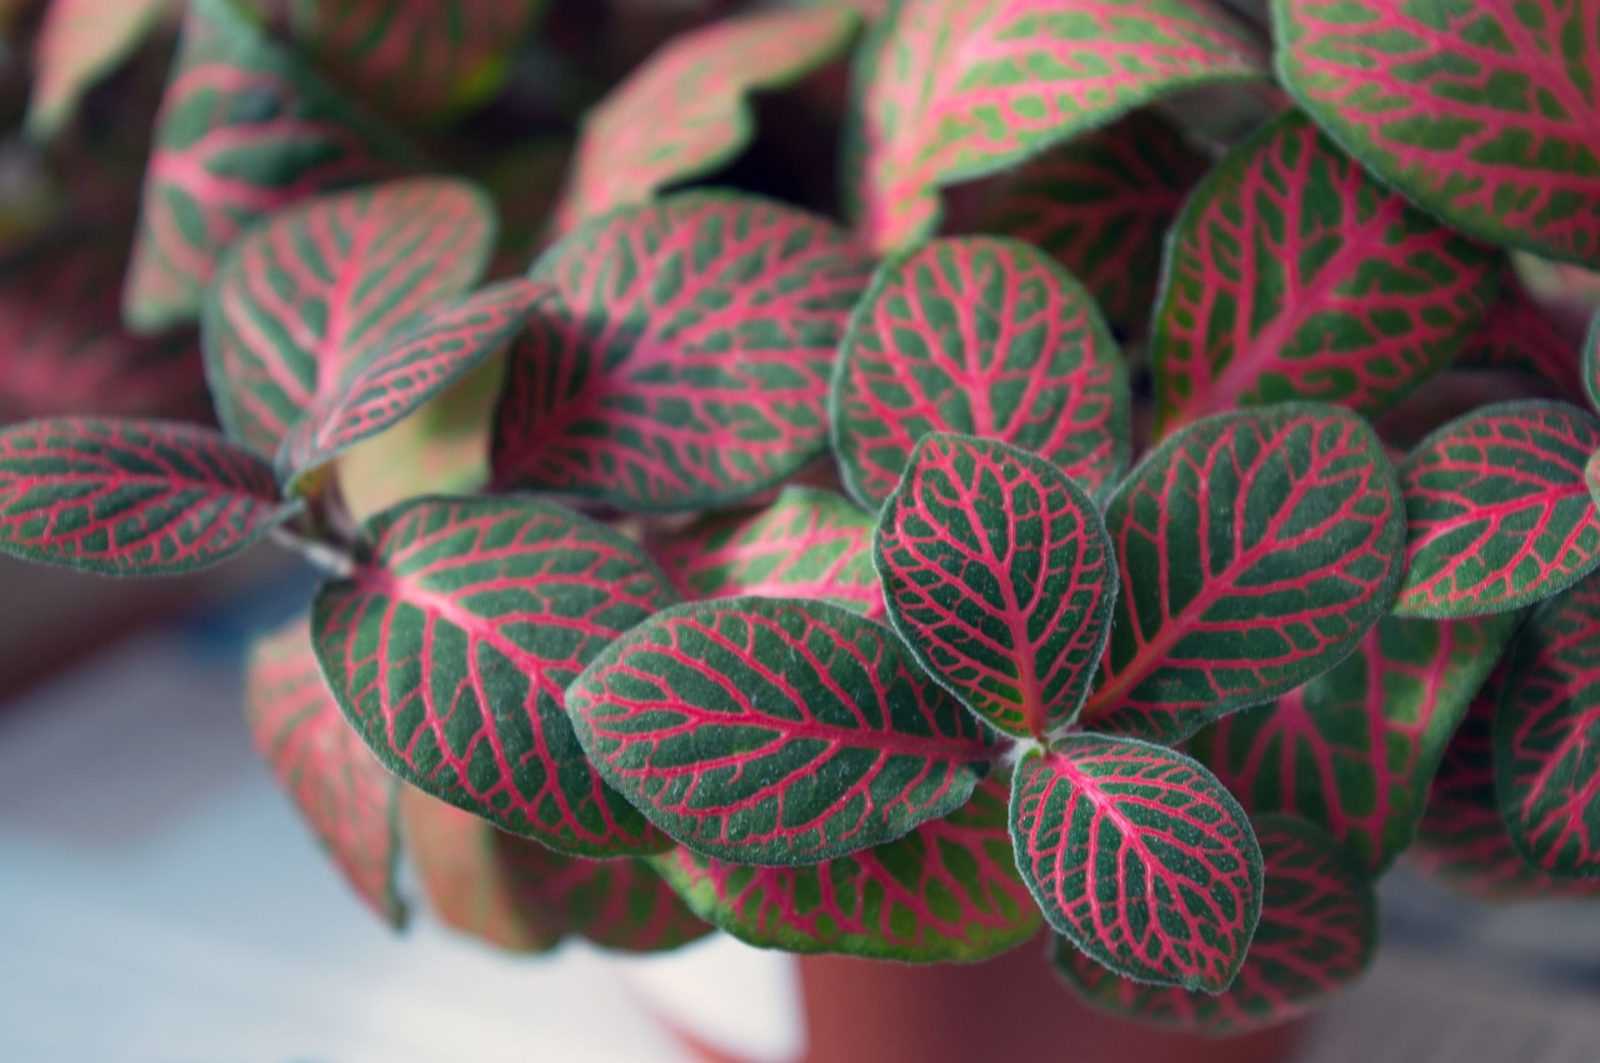
Фотографии фиттонии
Фиттония (Fittonia) — растение с уникальным листьями, которые покрыты яркими жилками различных окрасок. Фиттонии различаются по фактуре и цвету листьев, создавая неповторимую красоту.
На фотографиях фиттонии можно увидеть разнообразие окрасок листьев: от насыщенной зелени до ярких красных, розовых и белых оттенков. В жилках листьев фиттонии присутствуют разнообразные узоры и рисунки, которые делают растение еще более привлекательным и уникальным внешне.
Фотографии фиттонии также позволяют оценить форму и размеры листьев этого растения. У некоторых видов фиттонии листья имеют необычную плоскую форму, а у других — ярко выраженную волнистость или мозаичность. Разные размеры и формы листьев дают возможность выбора наиболее подходящей фиттонии для интерьера.
Фотографии фиттонии могут помочь при выборе растения для своей коллекции или для подарка близким людям. Уникальные листья фиттонии будут привлекать внимание и радовать глаз своими яркими цветами и насыщенными узорами.
Проблемы и болезни
1. Пересушивание почвы
Одной из распространенных проблем у фиттонии является пересушивание почвы. Если растение не получает достаточное количество влаги, его листья начнут пожелтевать и завянут. Чтобы избежать этой проблемы, следует регулярно проверять влажность почвы и поливать растение по мере необходимости. Также рекомендуется использовать поддон или применять метод полива снизу, чтобы корни растения всегда были во влажной среде.
2. Переувлажнение почвы
Переувлажнение почвы также может стать причиной проблем у фиттонии. Избыточное количество влаги может привести к гниению корней и развитию грибковых заболеваний. Чтобы избежать этой проблемы, необходимо не допускать застоя влаги в горшке и обеспечивать хорошую систему дренажа. Также стоит обратить внимание на выбор почвенной смеси, чтобы она была воздухопроницаемой и хорошо впитывала влагу.
3. Атака вредителей
Фиттония может быть подвержена атаке различных вредителей, таких как тли, паутинный клещ и шелкопряд. При поражении растения вредителями, на листьях могут появляться желтые пятна, паутина, липкая выделения и другие признаки. Для борьбы с вредителями можно использовать специальные инсектициды или народные методы, такие как мыльный раствор или настой чеснока.
4. Недостаток освещения
Фиттония предпочитает яркое, но рассеянное освещение. Если растение находится в недостатке света, его листья могут потерять яркость и стать бледными. Для решения этой проблемы необходимо перенести растение в более освещенное место или использовать искусственное освещение, например, фитолампы.
5. Температурные перепады
Фиттония чувствительна к температурным перепадам. Резкое изменение температуры может привести к желтеющим листьям и опаданию листьев. Чтобы избежать этой проблемы, следует держать растение в постоянной температуре и избегать резких перепадов.
Если вы заметили, что у вашей фиттонии возникли проблемы, необходимо принять меры по их устранению. Регулярный уход и правильные условия содержания помогут вашей фиттонии расти здоровой и красивой.
Подходящие культуры
Фиттония — это растение, которое хорошо сосуществует с другими влаголюбивыми культурами. Она может быть посажена вместе с папоротниками, такими как птерис или нептуния, которые также предпочитают высокую влажность воздуха и почвы.
Также фиттония хорошо сочетается с цветами, такими как виола или азалия, которые создают яркие краски и интересные текстуры на фоне зеленых листьев культуры.
Для создания декоративных композиций можно использовать фиттонию в сочетании с другими комнатными растениями, такими как пеларгония, папоротник нить, или филидендрон. Сочетание разных форм и оттенков листьев создаст эффектное растительное ансамбль.
Также можно разместить фиттонию вместе с суккулентами, например, с алоэ. Это будет интересное сочетание зеленых растений с разными текстурами и формами.
В общем, для создания гармоничного композиции с фиттонией можно выбирать растения, которые предпочитают схожие условия выращивания и имеют приблизительно одинаковые требования к влажности, освещению и температуре.
Популярные сорта
Фиттония — это растение с привлекательными полосатыми листьями, которые делают его очень популярным среди любителей комнатных растений. Существует несколько популярных сортов фиттонии, которые отличаются своими уникальными чертами.
Фиттония аргиронитида
Этот сорт фиттонии имеет зеленые листья с серебристыми жилками, что создает эффектное и привлекательное сочетание цветов. Она обладает компактным ростом и хорошо подходит для выращивания в горшках или контейнерах.
Фиттония вершина
Сорт фиттонии Вершина имеет ярко-красные листья с зелеными жилками, которые легко привлекают внимание. Она требует яркого освещения, но должна быть защищена от прямых солнечных лучей, чтобы избежать ожогов на листьях.
Фиттония розовая
Этот сорт имеет ярко-розовые листья с зелеными жилками, создавая яркий и красивый вид. Она предпочитает тень или полутень и требует регулярного полива.
Фиттония белая
Фиттония белая отличается своими белыми листьями с зелеными жилками. Она отлично смотрится на заднем плане или в сочетании с другими растениями. Она требует яркого освещения, но не выдерживает прямых солнечных лучей.
Все эти сорта фиттонии требуют умеренного полива, регулярного удобрения и поддержания определенной влажности воздуха. При правильном уходе эти растения могут стать ярким украшением вашего дома или офиса.
Вопрос-ответ:
Для фиттонии необходимо яркое, но рассеянное освещение. Она предпочитает теплую и влажную атмосферу. Регулярное поливание и опрыскивание листвы помогут поддерживать нужный уровень влажности. Также рекомендуется регулярно удобрять растение и периодически обрезать его, чтобы сохранить компактную форму.
Как часто нужно поливать фиттонию?
Фиттония требует регулярного полива. Подкормка полезна, особенно летом, при активном росте растения. Чтобы не переувлажнить почву, следует поливать ее, когда верхний слой высохнет на 1-2 см. Летом поливают чаще, зимой уменьшают количество поливов.
Где лучше размещать фиттонию в помещении?
Фиттония предпочитает яркое, но рассеянное светлое освещение. Она может расти на северном окне или в тенистом углу комнаты. Однако следует избегать прямого солнечного света, так как он может вызвать ожоги на листьях растения. Оптимальная температура для фиттонии составляет 18-24 °C.
Какие виды фиттонии существуют?
Существует несколько видов фиттонии. Одним из самых популярных является Фиттония Красивая (Fittonia Verschaffeltii), у которой листья зеленого цвета с яркими красными, белыми или розовыми жилками. Есть также Фиттония Аргиронервная (Fittonia Argyroneura) с серебристыми жилками на зеленых листьях, а также Фиттония Беллой (Fittonia Bella) с интересными округлыми листьями и белыми жилками.
Как размножать фиттонию?


: как вырастить из семян и какие виды и сорта существуют 4")


