- Start with Seedling Inspection: How to Choose Healthy Rose Plants
- 1. Variety and Type
- 2. Roots
- 3. Stem and Leaves
- 4. Buds and Flowers
- 5. Disease Resistance
- 6. Size and Condition
- 7. Packaging
- Preparation of Planting Pit: Creating the Ideal Environment for Roses
- Correct Planting Techniques: Ensuring Proper Positioning and Spacing
- Soil Preparation: Essential Steps for Optimal Growth and Nutrition
- 1. Choose the Right Location
- 2. Test the Soil
- 3. Amend the Soil
- 4. Remove Weeds and Debris
- 5. Dig a Proper Planting Hole
- 6. Create a Mound in the Hole
- 7. Water the Planting Hole
- 8. Plant the Rose Properly
- 9. Mulch the Soil Surface
- 10. Water and Maintain
- Watering and Fertilizing: Maintaining Healthy Moisture Levels and Nutrition
- Watering:
- Fertilizing:
- Mulching and Pruning: Protecting and Shaping Your Rose Plants
- Mulching
- Pruning
- Caring for Established Roses: Tips for Ongoing Maintenance and Disease Prevention
- 1. Pruning
- 2. Fertilizing
- 3. Watering
- 4. Mulching
- 5. Disease Prevention
- 6. Pest Control
- 7. Winter Protection
- 8. Regular Monitoring
- Conclusion
- Questions and Answers:
- What is the first step when planting roses?
- Why is it important to inspect the seedlings before planting?
- What should I look for when inspecting the seedlings?
- How do I prepare the planting pit for roses?
- What should I do with the roots of the seedling before planting?
- What is the ideal time to plant roses?
- Can I plant roses in containers?
- Videos: How to plant a Rose
Growing roses can be a rewarding and beautiful addition to any garden. However, to ensure their successful growth, it’s essential to start with the proper planting process. This article will guide you through the necessary steps to plant roses correctly, starting with seedling inspection and preparation of the planting pit.
Inspecting the Seedlings:
Before planting your rose seedlings, it’s crucial to inspect them carefully to ensure their health and quality. Look for seedlings that have sturdy stems and healthy leaves. Avoid any seedlings with signs of disease or damage. Additionally, check the root system to ensure it is well-developed and free from any signs of rot or pests.
Preparing the Planting Pit:
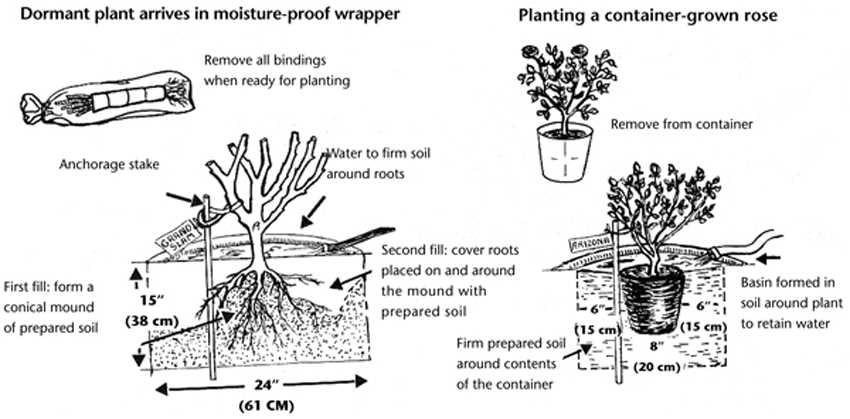
Once you have inspected your seedlings, it’s time to prepare the planting pit. Choose a location in your garden that receives at least six hours of direct sunlight each day. Dig a hole that is twice as wide and deep as the root ball of your seedling. Loosen the soil at the bottom of the pit and mix in some well-rotted compost or organic matter to improve drainage and provide nutrients for the plant.
Placing the Seedling:
Next, carefully place your seedling into the planting pit, ensuring that the bud union (the swollen area where the rose was grafted onto the rootstock) is level with or slightly above the soil surface. Gently backfill the pit with soil, firming it around the seedling’s roots to eliminate air gaps. Water the newly planted rose thoroughly to settle the soil and provide hydration.
Caring for the Newly Planted Rose:
After planting, proper care is crucial for the successful growth of your roses. Water your newly planted rose regularly, especially during dry periods, to keep the soil evenly moist but not waterlogged. Mulch around the base of the plant to help retain moisture and suppress weeds. Prune any dead or damaged growth, and remove spent flowers to encourage new blooms.
In conclusion, with careful seedling inspection and diligent preparation of the planting pit, you can ensure that your roses get off to the best start possible. Follow these steps, and your roses will reward you with vibrant blooms and a beautiful addition to your garden.
Start with Seedling Inspection: How to Choose Healthy Rose Plants
Before planting roses, it’s important to select healthy seedlings to ensure beautiful and thriving plants. Here are some key factors to consider when inspecting and choosing rose plants:
1. Variety and Type
Decide on the desired rose variety and type before purchasing seedlings. Whether you prefer hybrid teas, floribundas, climbers, or shrub roses, make sure to choose a variety that suits your climate and growing conditions.
2. Roots
Inspect the roots of the seedling carefully. They should be well-developed, firm, and light in color. Avoid plants with damaged, discolored, or overgrown roots, as these can indicate poor health.
3. Stem and Leaves
Check the stem and leaves for any signs of disease or damage. The stem should be sturdy and free of lesions or scars. The leaves should be green, lush, and free from discoloration, spots, or pests.
4. Buds and Flowers
Look for healthy buds and flowers on the seedling. Avoid plants with shriveled or discolored buds, as they may not bloom properly. Choose seedlings with at least one open flower or bud to ensure that you can enjoy their beauty right away.
5. Disease Resistance
Choose rose plants that are known for their disease resistance. This can help prevent common rose diseases such as powdery mildew and black spot. Look for seedlings labeled as disease-resistant or ask a knowledgeable garden center employee for recommendations.
6. Size and Condition
Consider the size and overall condition of the seedling. It should have a compact, bushy shape with good branching. Avoid plants that are leggy, stunted, or have yellowing leaves.
7. Packaging
Inspect the packaging of the seedling to ensure it is intact and properly labeled. Look for information on the rose variety, planting instructions, and the name of the nursery or supplier.
By carefully inspecting and choosing healthy rose plants, you can start your garden with the best possible foundation for beautiful, thriving roses.
Preparation of Planting Pit: Creating the Ideal Environment for Roses
Before planting roses, it is crucial to prepare the planting pit. This step ensures that the roses have the best environment for growth and development. Here are the necessary steps to prepare the planting pit:
- Choose the Right Location: Select a spot with at least six hours of direct sunlight daily. Ensure that the area has well-draining soil to prevent waterlogging.
- Clear the Area: Remove any weeds, rocks, or debris in the designated planting area. This process helps prevent competition for nutrients and reduces the risk of pests and diseases.
- Soil Preparation: Dig a hole for the planting pit that is large enough to accommodate the rose’s root system. The depth should be approximately twice the size of the pot the rose came in. Loosen the soil at the bottom of the hole and mix it with organic matter such as compost or well-rotted manure.
- Watering: Before placing the rose in the planting pit, thoroughly water the hole. This step helps in hydrating the roots and stabilizing the plant after planting.
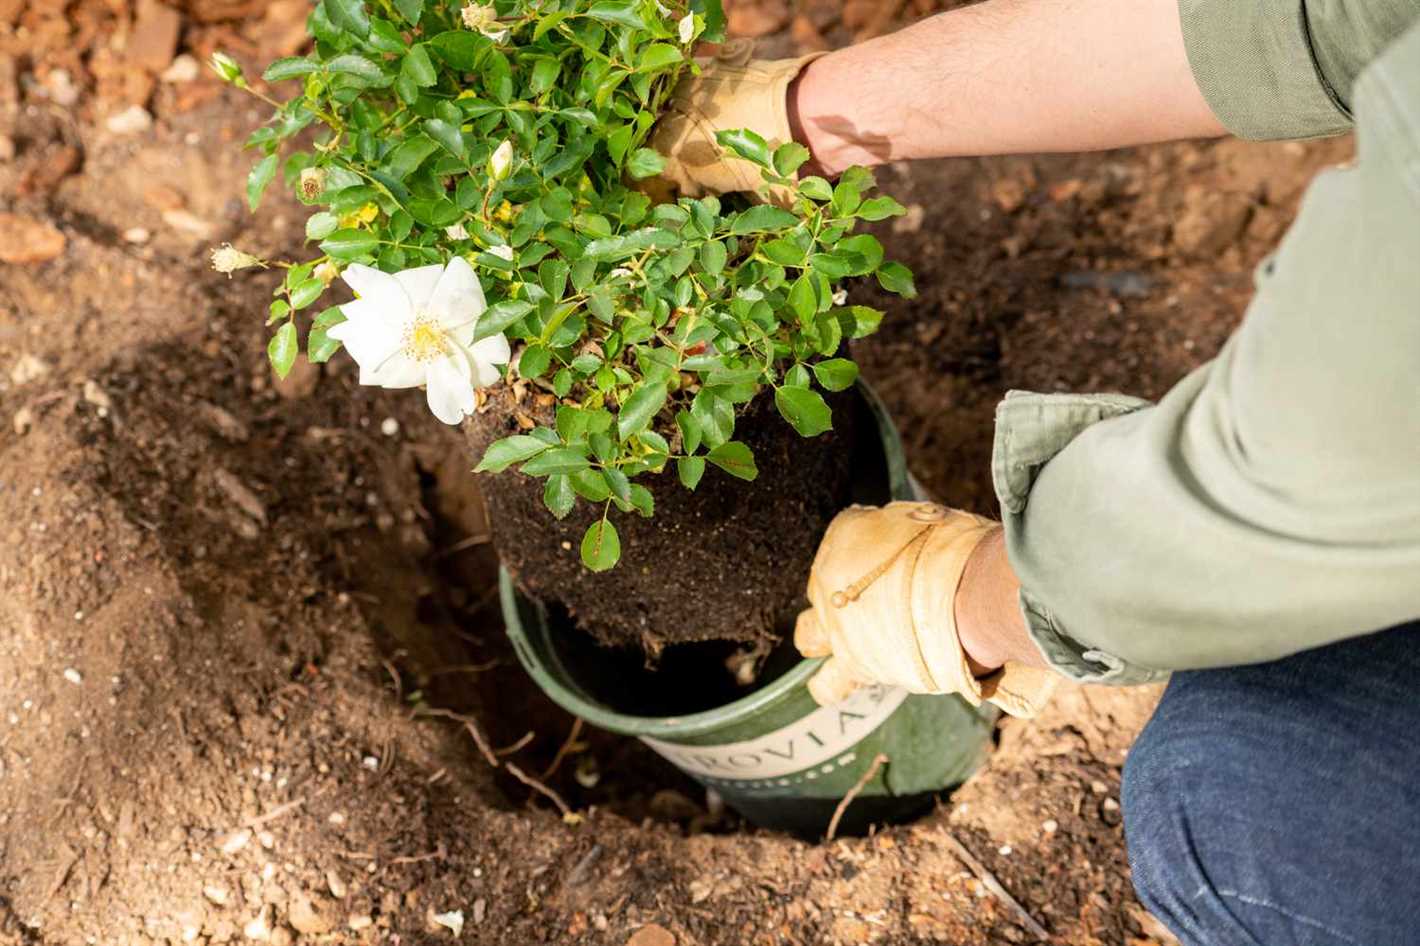
- Planting: Gently remove the rose from its container and tease out the roots if they are tightly wound. Place the rose in the center of the planting pit, ensuring that the bud union (the swollen area where the rose was grafted onto the rootstock) sits slightly above the soil level. Fill the hole with soil while gently firming it around the roots.
- Watering and Mulching: After planting, water the rose thoroughly to settle the soil and eliminate air pockets. Apply a layer of mulch around the plant to help retain moisture and suppress weed growth. Avoid placing mulch directly against the rose’s stem to prevent rotting.
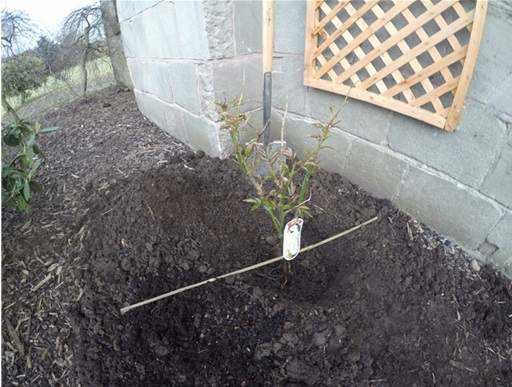
- Staking: If your rose is particularly tall or if it is in an area prone to strong winds, consider staking it for support. This step ensures that the plant remains upright during its initial stages of growth.
By following these steps for preparing the planting pit, you create an ideal environment for your roses to thrive. Taking the time to properly prepare the planting area sets the stage for healthy growth and abundant blooms.
Correct Planting Techniques: Ensuring Proper Positioning and Spacing
- Choose the Right Spot: Select a location for planting your roses that receives at least six hours of direct sunlight per day. Ensure the soil is well-drained and rich in organic matter.
- Prepare the Soil: Before planting, loosen the soil in the planting area to a depth of approximately 12 inches. Remove any weeds, rocks, or debris and amend the soil with compost or well-rotted manure to improve its fertility and drainage.
- Inspect the Seedlings: Before planting the rose seedlings, carefully inspect them for any signs of disease or damage. Look for healthy, well-developed roots and sturdy stems.
- Positioning: Dig a hole in the prepared soil that is wide and deep enough to accommodate the rose seedling’s roots without crowding or bending them. Position the seedling in the hole, ensuring the bud union is level with or slightly above the soil surface.
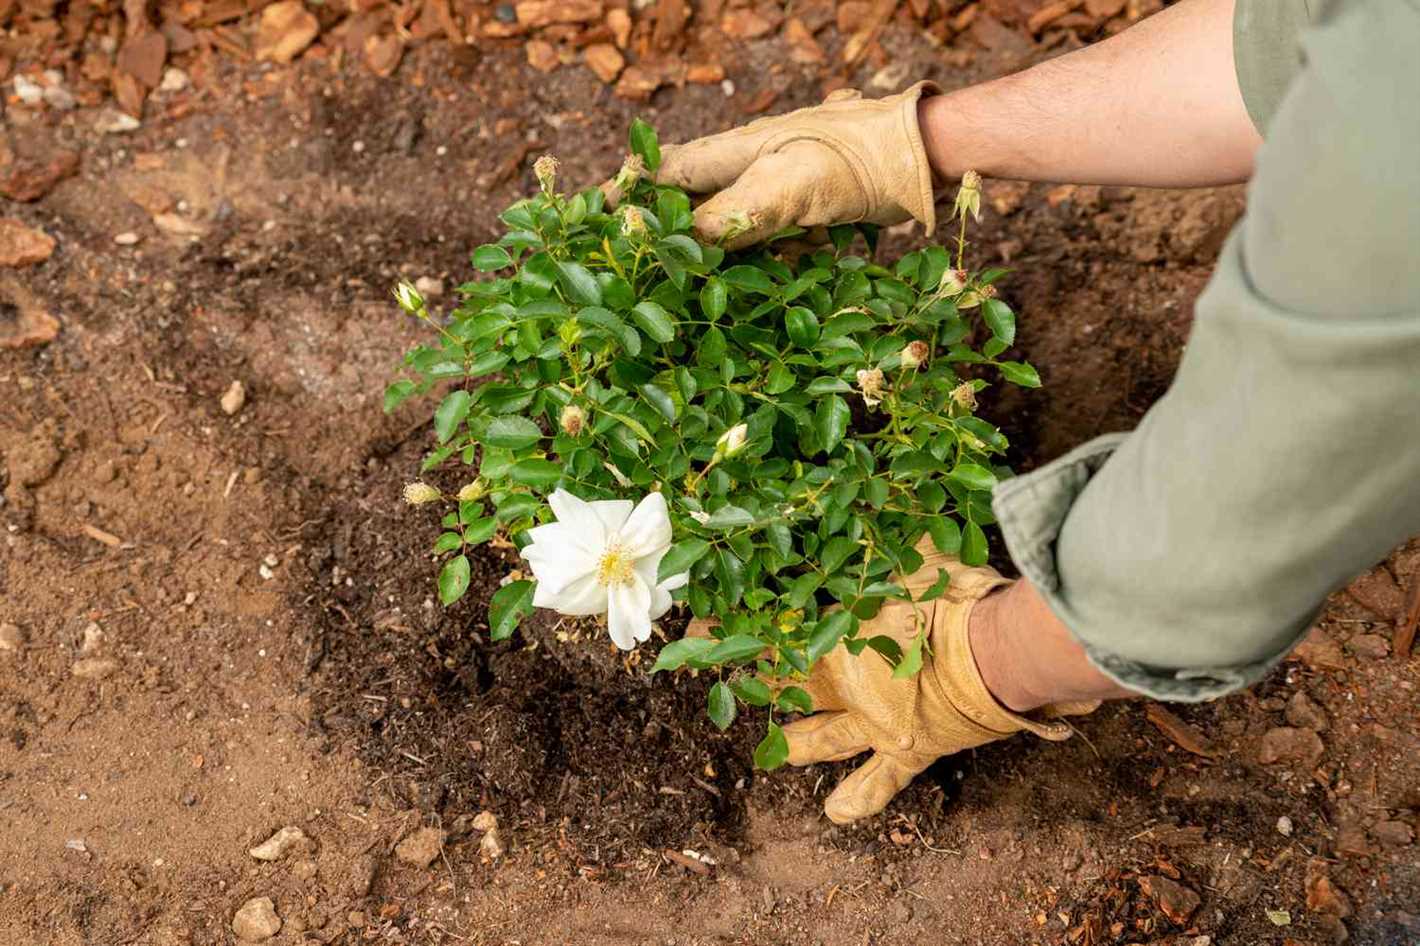
- Backfill and Firm the Soil: Gently backfill the hole with the amended soil, ensuring the roots are completely covered. Tamp down the soil gently to remove any air pockets and to provide stability to the seedling.
- Spacing: Ensure proper spacing between rose plants to allow for adequate air circulation and growth. Different rose varieties have different spacing requirements, so refer to the specific instructions for your selected rose variety.
Following these correct planting techniques will help ensure that your rose seedlings are positioned properly and spaced correctly for healthy growth and development. Proper positioning and spacing will also promote better air circulation, reduce the risk of disease, and allow each rose plant to thrive to its full potential.
Soil Preparation: Essential Steps for Optimal Growth and Nutrition
Proper soil preparation is crucial for the successful growth and nutrition of your roses. By following these essential steps, you can create an ideal environment for your roses to thrive:
1. Choose the Right Location
Select a well-drained location for planting your roses. They prefer full sunlight with at least 6 hours of direct sunlight each day. Avoid areas with heavy shade or where water tends to accumulate.
2. Test the Soil
Before planting, it is important to test the soil pH and fertility. Roses prefer slightly acidic soil with a pH range of 6.0 to 6.5. You can use a soil testing kit or send a soil sample to a local agricultural extension office for analysis.
3. Amend the Soil

Based on the soil testing results, you may need to amend the soil to create optimal conditions for roses. If the soil pH is too high, add sulfur or peat moss to lower it. If the soil lacks nutrients, incorporate organic matter such as compost or well-rotted manure to improve fertility.
4. Remove Weeds and Debris
Clear the planting area of any weeds, grass, or debris that may compete with the roses for nutrients and water. This will ensure that the roses have access to all the resources they need to grow and thrive.
5. Dig a Proper Planting Hole

Dig a planting hole that is wide and deep enough to accommodate the rose’s roots. The hole should be at least 18 inches wide and 12 inches deep. Loosen the soil at the bottom of the hole to encourage root growth.
6. Create a Mound in the Hole
In the center of the planting hole, create a mound by adding soil mixed with compost or organic matter. This will provide a nutrient-rich zone for the rose’s roots to establish and penetrate into the surrounding soil.
7. Water the Planting Hole
Prior to planting, thoroughly water the planting hole to ensure the soil is moist. This will help the rose to establish its roots and reduce transplant shock.
8. Plant the Rose Properly
Place the rose seedling in the center of the planting hole, ensuring that the bud union (the swollen area where the rose is grafted onto the rootstock) sits slightly above the soil level. Backfill the hole with soil, gently firming it around the roots.
9. Mulch the Soil Surface
Apply a layer of organic mulch, such as wood chips or straw, around the base of the rose plant. This will help to retain soil moisture, suppress weed growth, and regulate soil temperature.
10. Water and Maintain
After planting, water the roses thoroughly and regularly to keep the soil consistently moist. Monitor the plants for any signs of pests or diseases, and provide adequate fertilizer and nutrients according to the specific needs of your rose variety.
By following these essential steps for soil preparation, you can create an optimal growing environment for your roses. This will result in healthy plants, abundant blooms, and beautiful garden displays.
Watering and Fertilizing: Maintaining Healthy Moisture Levels and Nutrition

Maintaining proper moisture levels and providing adequate nutrition are crucial for the healthy growth and development of roses. Here are some tips on watering and fertilizing roses.
Watering:
Roses require consistent moisture to thrive, especially during their growing season. Here are some guidelines for watering your roses:
- Water deeply and thoroughly: When you water your roses, make sure to soak the soil around the plant deeply. This helps promote the development of a strong root system.
- Water in the morning: Watering in the morning allows the leaves to dry out during the day, reducing the risk of fungal diseases.
- Avoid wetting the leaves: When watering, try to focus on the base of the plant and avoid wetting the leaves. This again helps prevent fungal infections.
- Monitor soil moisture: Regularly check the soil moisture level around your roses. Stick your finger into the soil about an inch deep. If it feels dry, it’s time to water.
- Water consistently: Try to maintain a consistent watering schedule to prevent stress on the plant. Avoid overwatering or allowing the soil to dry out completely.
Fertilizing:
In addition to water, roses also need proper nutrition to grow and bloom vigorously. Here are some guidelines for fertilizing your roses:
- Choose the right fertilizer: Look for a balanced rose fertilizer with a ratio of NPK (nitrogen, phosphorus, and potassium) that suits the needs of roses.
- Apply fertilizer in early spring: Start fertilizing your roses in early spring, when new growth begins. Follow the instructions on the fertilizer packaging for the correct application rate.
- Apply fertilizer during the growing season: Repeat the application of fertilizer every 6-8 weeks during the growing season to provide a continuous supply of nutrients.
- Avoid over-fertilizing: Too much fertilizer can result in excessive foliage growth or weak, leggy stems. Follow the recommended dosage to avoid over-fertilizing.
- Water after fertilizing: After applying fertilizer, make sure to water your roses thoroughly. This helps to ensure that the nutrients are effectively released and reach the roots.
By following these watering and fertilizing practices, you can help maintain healthy moisture levels and provide essential nutrients to your roses, ensuring their overall health and beautiful blooms.
Mulching and Pruning: Protecting and Shaping Your Rose Plants

Mulching and pruning are key practices for protecting and shaping your rose plants. These techniques not only help maintain the health and appearance of your roses, but also promote better growth and flower production.
Mulching
Mulching is the process of adding a layer of material around the base of your rose plants. This layer helps to conserve moisture, suppress weed growth, and regulate soil temperature.
To mulch your roses, follow these steps:
- Clean the area around the plants by removing weeds and debris.
- Add a layer of organic material, such as wood chips, straw, or compost, around the base of the plants. Make sure the layer is about 2-4 inches thick and extends to the drip line (the area below the outermost branches).
- Leave a small gap between the mulch and the stems of the plants to avoid moisture buildup and potential disease issues.
- Replenish the mulch layer as needed, especially after heavy rain or decomposition.
Mulching should be done in the early spring or late fall to provide the best protection for your rose plants throughout the year.
Pruning
Pruning is a crucial step in maintaining the shape and vigor of your rose plants. It helps remove dead or diseased wood, promotes new growth, and encourages better airflow and light penetration.
Here are the basic steps for pruning your roses:
- Start by removing any dead, damaged, or crossing branches to improve the overall structure of the plant.
- Next, remove any weak or thin stems that may not be able to support blooms.
- Prune back the remaining healthy stems to a desirable size, making cuts just above an outward-facing bud or a set of five leaflets.
- Open up the center of the plant by removing any inward-growing branches or branches that are crowding the middle.
- Finally, remove any suckers (vigorous shoots growing from the plant’s rootstock) by making a clean cut at their base.
Pruning should be done in early spring, before new growth appears, or in late winter for cold climates. Regular pruning throughout the growing season can also help maintain the shape and size of your roses.
By practicing proper mulching and pruning techniques, you can protect and shape your rose plants, ensuring they thrive and provide beautiful blooms year after year.
Caring for Established Roses: Tips for Ongoing Maintenance and Disease Prevention
1. Pruning
Regular pruning is essential for maintaining the health and shape of established roses. Prune your roses during the dormant season, typically in late winter or early spring, before new growth starts. Remove any dead, damaged, or diseased canes, as well as any crossing or rubbing branches. Aim to open up the center of the plant to promote airflow and discourage diseases.
2. Fertilizing
Feed your established roses regularly to provide them with the necessary nutrients for healthy growth. Use a balanced rose fertilizer or a slow-release granular fertilizer specifically formulated for roses. Apply the fertilizer according to the manufacturer’s instructions, usually in early spring and again in late summer. Be careful not to over-fertilize, as this can lead to excessive foliage growth and reduced flower production.
3. Watering

Maintain a consistent watering routine for your roses, especially during dry periods. Roses typically require about 1 inch of water per week, either from rainfall or supplemental irrigation. Water deeply and thoroughly, ensuring that the root zone is adequately moistened. Avoid overhead watering, as wet foliage can contribute to disease development.
4. Mulching
Apply a layer of organic mulch around the base of your established roses to conserve moisture, suppress weed growth, and improve soil fertility. Use materials such as shredded bark, compost, or straw, and spread the mulch to a depth of 2-3 inches. Be sure to keep the mulch a few inches away from the base of the rose plant to prevent rotting.
5. Disease Prevention
To prevent common rose diseases such as black spot and powdery mildew, practice good hygiene and disease prevention techniques. Remove and dispose of any fallen leaves or debris around the base of the plants. Avoid overhead watering, as wet foliage promotes disease development. Additionally, consider using organic fungicides or preventative sprays to protect your roses from fungal diseases.
6. Pest Control
Monitor your established roses regularly for signs of pests such as aphids, thrips, or spider mites. If you notice any infestations, take appropriate measures to control the pests. This can include handpicking them off the plants, blasting them with a strong stream of water, or using organic insecticidal soaps or horticultural oils. Encourage beneficial insects such as ladybugs and lacewings, which naturally control many common rose pests.
7. Winter Protection
Prepare your established roses for winter by providing appropriate protection. In colder climates, you can mound soil or mulch around the base of the plants to insulate the roots. Alternatively, you can use protective covers, such as burlap or frost blankets, to shield the plants from harsh winter winds and temperatures. Prune your roses lightly in late fall to remove any dead or weak growth that could be susceptible to winter damage.
8. Regular Monitoring
Keep a close eye on your established roses throughout the growing season. Monitor them for any signs of stress, disease, or nutrient deficiencies. Promptly address any issues that arise to prevent them from worsening and affecting the overall health and vigor of the plants. Regular monitoring allows you to catch problems early and take appropriate action.
Conclusion
By following these tips for ongoing maintenance and disease prevention, you can ensure the long-term health and beauty of your established roses. Regular pruning, fertilizing, watering, mulching, disease prevention, pest control, winter protection, and monitoring will contribute to thriving roses that provide years of enjoyment in your garden.
Questions and Answers:
What is the first step when planting roses?
The first step when planting roses is to inspect the seedlings.
Why is it important to inspect the seedlings before planting?
Inspecting the seedlings before planting is important because it allows you to check for any diseases or pests that could harm the plants.
What should I look for when inspecting the seedlings?
When inspecting the seedlings, you should look for signs of disease, such as black spots on the leaves, as well as any insect damage.
How do I prepare the planting pit for roses?
To prepare the planting pit for roses, start by digging a hole that is wide and deep enough to accommodate the roots of the seedling. Mix in organic matter, such as compost, with the soil to improve drainage and fertility.
What should I do with the roots of the seedling before planting?
Before planting, prune any damaged or broken roots from the seedling. You can also soak the roots in water for a few hours to ensure they are hydrated before planting.
What is the ideal time to plant roses?
The ideal time to plant roses is in the early spring or fall when the weather is cool. This allows the plants to establish their roots before the hot summer or cold winter.
Can I plant roses in containers?
Yes, you can plant roses in containers. Just make sure to choose a large enough container with good drainage, and use a high-quality potting mix. Container-grown roses will require more frequent watering and fertilizing compared to those planted in the ground.


