- Understanding Calibrachoa Cuttings
- What are calibrachoa cuttings?
- When to take calibrachoa cuttings?
- How to take calibrachoa cuttings?
- How to care for calibrachoa cuttings?
- Conclusion
- Preparing the Cuttings
- Materials Needed:
- Procedure:
- Providing Optimal Growing Conditions
- Choosing the Right Rooting Medium
- Key Considerations for Choosing a Rooting Medium
- Common Rooting Medium Options
- Applying Rooting Hormones
- Proper Watering Techniques
- 1. Watering Schedule
- 2. Watering Methods
- 3. Monitoring Soil Moisture
- 4. Proper Drainage
- 5. Consider Using a Soil Moisture Meter
- 6. Be Cautious with Watering Volume
- 7. Proper Water Quality
- Avoiding Overwatering and Rotting
- 1. Proper watering technique
- 2. Proper pot selection
- 3. Adequate air circulation
- 4. Avoiding high humidity
- 5. Regular monitoring
- Caring for Rooted Cuttings
- 1. Transplant the rooted cuttings
- 2. Provide appropriate lighting
- 3. Maintain proper humidity
- 4. Watering
- 5. Fertilization
- 6. Pruning
- 7. Monitor for pests and diseases
- Questions and Answers:
- Is it possible to propagate calibrachoa from cuttings?
- What is the best time to take cuttings from calibrachoa?
- How should I prepare the cutting before planting?
- What are the best conditions for rooting calibrachoa cuttings?
- How long does it take for calibrachoa cuttings to root?
- Videos: How To Grow Petunia From Cuttings , petunia propagation , petunia care
Calibrachoa, also known as million bells, is a beautiful flowering plant that is popular among gardeners for its vibrant colors and long blooming season. One of the easiest ways to propagate calibrachoa is through stem cuttings, which allows you to create new plants that are genetically identical to the parent plant. However, rooting the cuttings can sometimes be a challenge, and the cuttings can also be prone to rotting if not properly cared for. In this article, we will discuss some tips and techniques to ensure successful rooting of calibrachoa cuttings and prevent rotting.
When taking cuttings from a calibrachoa plant, it is important to select healthy, disease-free stems that are actively growing. Ideally, the stems should be about 3-4 inches long and have at least one pair of leaves. To take the cuttings, use a clean and sharp pair of pruning shears to make a diagonal cut just below a node, which is the point where leaves or buds emerge from the stem. Removing the bottom pair of leaves will help stimulate root growth and prevent rotting.
Tip: It is best to take cuttings in the morning when the plant is well hydrated. This will increase the chances of successful rooting.
After taking the cuttings, immediately dip the bottom inch of the stems in a rooting hormone powder. Rooting hormones contain auxins, which are natural plant hormones that stimulate root development. This will help the cuttings develop roots more quickly and increase their chances of successfully rooting. Make sure to tap off any excess powder before placing the cuttings in a container filled with a well-draining rooting medium, such as perlite or vermiculite.
Tip: It is a good idea to mist the cuttings with water before applying the rooting hormone powder. This will help the powder adhere to the stems more effectively.
Place the container with the cuttings in a warm and bright location, but out of direct sunlight. The ideal temperature for rooting calibrachoa cuttings is between 70-75°F (21-24°C). It is also important to provide high humidity, as this will help prevent the cuttings from drying out. You can achieve this by placing a clear plastic bag or a propagator lid over the container. Just make sure to open the bag or lid for a short period each day to allow fresh air to circulate and prevent mold growth.
Understanding Calibrachoa Cuttings
Calibrachoa is a popular flowering plant often used in hanging baskets and containers. It is known for its vibrant colors and long-lasting blooms. If you want to propagate calibrachoa, one of the easiest methods is through cuttings. Understanding the process of calibrachoa cuttings is essential for successful propagation.
What are calibrachoa cuttings?
Calibrachoa cuttings are small sections of the plant that are taken from the parent plant and used to grow new plants. These cuttings typically consist of a stem with leaves and nodes, which are important for root development.
When to take calibrachoa cuttings?
It is best to take calibrachoa cuttings in spring or early summer when the parent plant is actively growing. At this time, the plant’s energy is focused on new growth, making it more likely that the cuttings will root successfully.
How to take calibrachoa cuttings?
To take calibrachoa cuttings, follow these steps:
- Choose a healthy parent plant with strong, vigorous growth.
- Sterilize your cutting tools, such as pruning shears, to prevent the spread of diseases.
- Select a stem that is 3-4 inches long and has at least two sets of mature leaves.
- Cut the stem just below a leaf node, making a clean, angled cut.
- Remove any lower leaves from the stem, leaving only the top set intact.
- Optional: Dip the cut end of the stem in rooting hormone to promote root development.
- Plant the cutting in a well-draining rooting medium, such as a mixture of perlite and peat moss.
- Water the cutting thoroughly and place it in a warm, bright location with indirect sunlight.
How to care for calibrachoa cuttings?
Proper care is crucial for the success of calibrachoa cuttings. Here are some care tips:
- Keep the rooting medium moist but not overly wet to prevent rotting.
- Avoid exposing the cuttings to direct sunlight, as it can scorch the delicate leaves.
- Create a humid environment by covering the cuttings with a plastic bag or domed lid.
- Remove any yellowing or decaying leaves to prevent the spread of diseases.
- Provide bottom heat, such as using a heating mat, to encourage faster root growth.
Conclusion
Understanding calibrachoa cuttings is the key to successfully propagating this beautiful flowering plant. By following the proper techniques and providing the right care, you can grow new calibrachoa plants from cuttings and enjoy their vibrant blooms in your garden or containers.
Preparing the Cuttings
Before taking cuttings from the Calibrachoa plant, it is important to gather all the necessary materials and prepare them properly. This will ensure that the cuttings have the best chance of rooting successfully and minimize the risk of rotting.
Materials Needed:
- Sharp, sterilized pruners or scissors
- Clean, well-draining rooting medium (such as perlite or vermiculite)
- Small pots or trays with drainage holes
- Clear plastic bags or plastic domes
- Rooting hormone (optional)
- Watering can or spray bottle
Procedure:
- Start by choosing healthy, disease-free parent plants from which to take the cuttings. These plants should have strong stems and vibrant foliage.
- Sterilize your pruners or scissors by wiping them with rubbing alcohol or dipping them in a bleach solution. This will help prevent the spread of diseases.
- Fill the pots or trays with the rooting medium. Make sure it is clean, well-draining, and moistened.
- Take 3-4 inch stem cuttings from the parent plant, making sure to include a node (where the leaves emerge) at the base of each cutting.
- Remove any flowers, buds, or leaves from the bottom half of the cutting.
- If desired, dip the bottom end of each cutting in rooting hormone to encourage faster root development.
- Insert the cuttings into the prepared pots or trays, making sure to bury the node and leaving at least two leaves exposed above the rooting medium.
- Water the cuttings gently to settle the rooting medium around them. Avoid over-watering, as excessive moisture can lead to rotting.
- Cover the pots or trays with clear plastic bags or plastic domes to create a humid environment for the cuttings.
- Place the cuttings in a bright, but indirect light area where they will receive 6-8 hours of light per day.
- Monitor the cuttings regularly for signs of rooting. Mist the cuttings with water if they appear to be drying out.
- After 2-4 weeks, the cuttings should develop roots. At this point, you can remove the plastic cover and gradually acclimate the plants to ambient humidity and light.
By following these steps and properly preparing the cuttings, you can increase the chances of successful root development and prevent rotting. Remember to monitor the cuttings regularly and provide the necessary care for their healthy growth.
Providing Optimal Growing Conditions
- Choose a well-draining growth medium: A well-draining growth medium is essential to prevent the cuttings from sitting in wet conditions, which can lead to rotting. Use a lightweight soil mix that contains a combination of peat moss, perlite, and vermiculite.
- Maintain adequate moisture levels: While it is important to avoid overwatering, it is equally important to ensure that the cuttings have enough moisture to promote root development. Check the moisture level regularly and water the cuttings when the top inch of the soil feels dry to the touch.
- Provide sufficient light: Place the cuttings in a location that receives bright, indirect light. Calibrachoa cuttings need around 12-14 hours of light per day. You can use artificial grow lights to supplement natural light if needed.
- Maintain a warm temperature: Calibrachoa cuttings prefer a warm environment for root development. Aim to maintain a temperature between 70-75 °F (21-24 °C) during the rooting process. Avoid exposing the cuttings to extreme temperature fluctuations.
- Use a rooting hormone: To enhance the success rate of rooting, consider using a rooting hormone. Dip the cut ends of the calibrachoa cuttings in a rooting hormone powder or gel before inserting them into the growing medium.
- Provide good air circulation: Proper air circulation is important to prevent the development of fungal diseases. Avoid overcrowding the cuttings and ensure there is adequate space between them. If necessary, use a small fan to create a gentle air movement around the cuttings.
- Avoid direct contact with soil: To prevent rotting, avoid burying the cuttings directly into the soil. Instead, place the cuttings into the growth medium, making sure that only the bottom part of the stem comes into contact with it. This will help prevent excess moisture from causing rotting.
- Monitor for pests and diseases: Regularly inspect the cuttings for any signs of pests or diseases. Common pests that may affect calibrachoa cuttings include aphids, spider mites, and thrips. If any pests or diseases are detected, take appropriate measures to control and treat them.
Choosing the Right Rooting Medium
Choosing the right rooting medium is essential for successful rooting of Calibrachoa cuttings and preventing rotting. The rooting medium is the material in which the cuttings are placed to encourage the development of roots. It provides a suitable environment for the cuttings to root and grow.
Key Considerations for Choosing a Rooting Medium
- Drainage: The rooting medium should have good drainage to prevent waterlogged conditions that can lead to rotting. It should allow excess water to flow out, ensuring that the roots don’t sit in stagnant water.
- Aeration: Sufficient oxygen is vital for root development. The rooting medium should have good air circulation, allowing oxygen to reach the roots. This can be achieved through a combination of coarse materials in the medium.
- Moisture Retention: While drainage is essential, the rooting medium should also have the ability to retain moisture. It should strike a balance between providing adequate moisture for the cuttings’ needs without being overly waterlogged.
- pH Balance: The pH level of the rooting medium should be within the appropriate range for Calibrachoa. A slightly acidic pH, around 5.5 to 6.5, is generally suitable for optimal root growth.
Common Rooting Medium Options
Various types of materials can be used as rooting mediums for Calibrachoa cuttings. Here are some popular options:
| Rooting Medium | Advantages | Considerations |
|---|---|---|
| Peat-based mix | – Excellent moisture retention – Good aeration – Available commercially | – May require additional amendments like perlite for improved drainage – May have higher initial cost |
| Vermiculite | – Excellent moisture retention – Adequate aeration – Lightweight | – May require additional amendments like perlite for improved drainage – pH may need adjusting |
| Perlite | – Excellent drainage – Good aeration – Lightweight | – Doesn’t retain moisture well on its own – May need to be mixed with other materials |
| Sand | – Excellent drainage – Inexpensive | – Doesn’t retain moisture well on its own – May need to be mixed with other materials |
It’s important to note that the rooting medium should be sterilized before use to prevent the introduction of pathogens that can cause rotting. Additionally, maintaining appropriate moisture levels and providing proper care during the rooting process will also contribute to successful root development and prevent rotting.
Applying Rooting Hormones
Rooting hormones can help enhance the success rate of calibrachoa cuttings by stimulating root growth. These hormones are typically available in powdered, liquid, or gel form. Here are some guidelines for applying rooting hormones to calibrachoa cuttings:
- Choose the right hormone: There are different types of rooting hormones available, such as indole-3-butyric acid (IBA) and naphthalene acetic acid (NAA). Follow the instructions provided with the hormone to determine the appropriate concentration and application method.
- Prepare the hormone solution: If using powdered hormone, mix it with water according to the instructions. Liquid and gel forms are usually ready to use.
- Prep the cuttings: Take the calibrachoa cuttings and remove any excess foliage from the bottom portion, leaving only a few leaves at the top. This will help redirect energy towards root development.
- Dip the cuttings: Dip the bottom of each cutting into the hormone solution for a few seconds, ensuring that the cut end is completely covered.
- Plant the cuttings: After applying the rooting hormone, plant the cuttings in a well-draining rooting medium, such as a mixture of perlite and peat moss. Make sure to press the medium firmly around the base of each cutting.
- Provide appropriate environmental conditions: Place the cuttings in a warm and humid environment, ideally under a propagation dome or covered with a plastic bag. Maintain a temperature of around 21-24°C (70-75°F) and provide indirect light.
- Monitor and keep moist: Check the cuttings regularly and ensure that the rooting medium remains moist but not overly saturated. Mist the cuttings with water if necessary to maintain humidity.
- Transplanting: Once the cuttings have rooted and developed a healthy root system, they can be transplanted into individual pots or containers with a well-draining potting mix.
By applying rooting hormones and providing the right conditions for root development, you can increase the chances of successful rooting and prevent rotting in calibrachoa cuttings.
Proper Watering Techniques
Watering is a critical component in the successful rooting of Calibrachoa cuttings. Proper watering techniques ensure that the cuttings receive the right amount of moisture without becoming waterlogged, which can lead to rotting.
1. Watering Schedule
Establishing a consistent watering schedule is important for the overall health of the cuttings. Aim to water the cuttings once or twice a day, depending on the environmental conditions. However, it’s crucial to monitor the soil moisture levels to prevent overwatering.
2. Watering Methods
There are several effective watering methods for Calibrachoa cuttings:
- Bottom Watering: This method involves placing the cuttings in a tray filled with water. This allows the plants to absorb moisture from the bottom up, preventing excessive moisture on the foliage.
- Misting: Misting the cuttings with a fine spray of water helps them retain moisture without saturating the soil. This method is especially useful during hot and dry periods.
3. Monitoring Soil Moisture
Regularly monitoring the soil moisture level is crucial to prevent overwatering or underwatering the cuttings. Insert your finger into the soil up to the first knuckle; if it feels slightly moist, it is an indication that the cuttings have enough water. If the soil feels dry, it’s time to water the cuttings.
4. Proper Drainage
Ensuring proper drainage is essential to prevent water accumulation and rotting. Make sure the pots or trays have drainage holes to allow any excess water to escape. Standing water can lead to fungal diseases, so it’s important to avoid it.
5. Consider Using a Soil Moisture Meter
If you want to be more precise in monitoring the soil moisture, consider using a soil moisture meter. This handy tool allows you to measure the moisture levels accurately and avoid any guesswork.
6. Be Cautious with Watering Volume
Avoid overwatering the cuttings, as excessive moisture can lead to rotting. Water the plants just enough to keep the soil slightly moist, but not waterlogged. Adjust the amount of water according to the environmental conditions, as humidity levels and temperature can impact the plant’s water requirements.
7. Proper Water Quality
Using clean and high-quality water is important for the health of the cuttings. Avoid using water that contains high levels of salts or chemicals, as they can damage the plants. Consider using filtered or distilled water for watering.
By following these proper watering techniques, you can help ensure successful rooting and prevent rotting in your Calibrachoa cuttings.
Avoiding Overwatering and Rotting
1. Proper watering technique
One of the most common causes of rotting in cuttings is overwatering. It is essential to provide the right amount of moisture for the cuttings without saturating the soil. Here are some tips for proper watering technique:
- Water the cuttings only when the top inch of the soil feels dry to the touch.
- Use a well-draining potting mix that allows excess water to drain away.
- Avoid watering the cuttings from above as it can lead to water accumulation around the stem and increase the risk of rot.
- Instead, water the cuttings from the bottom by placing the pot in a tray of water and allowing the soil to soak up the water through the drainage holes.
- Empty the excess water from the tray after the soil has absorbed sufficient moisture.
2. Proper pot selection
The choice of pot for rooting cuttings can also affect the risk of rotting. Here’s what to consider when selecting a pot:
- Choose a pot with good drainage holes to allow excess water to flow out.
- Avoid using pots that are too large for the cuttings, as it can retain excess moisture and increase the chance of rot.
- Opt for smaller pots or cell trays that provide a snug fit for the cuttings.
3. Adequate air circulation
Proper air circulation around the cuttings is important to prevent the accumulation of moisture and the growth of mold or fungus. Here’s how to ensure adequate air circulation:
- Space the cuttings apart in the pot or tray to allow air to circulate around each cutting.
- Avoid overcrowding the cuttings, as it can create a humid environment that promotes rotting.
- Place the cuttings in a well-ventilated area with good air movement.
4. Avoiding high humidity
High humidity can increase the chances of rotting in cuttings. Here are some measures to avoid high humidity:
- Choose a well-ventilated location for rooting the cuttings.
- Avoid misting the cuttings or using a humidity dome, as it can create a humid environment that promotes rot.
- Monitor the humidity levels in the rooting area and take steps to reduce it if necessary, such as using a dehumidifier or increasing ventilation.
5. Regular monitoring
Regular monitoring of the cuttings is crucial to detect any signs of rotting early on. Here’s what to look out for:
- Inspect the cuttings regularly for any discoloration, softening, or foul smell, which may indicate rotting.
- If any rotting signs are detected, remove the affected cuttings immediately to prevent the spread of disease.
- Adjust the watering routine or other environmental factors if necessary based on the condition of the cuttings.
By following these tips and properly managing the watering and environmental conditions, you can effectively prevent overwatering and rotting in your calibrachoa cuttings, increasing the chances of successful rooting.
Caring for Rooted Cuttings
Once your cuttings have developed roots, it is important to provide them with proper care to ensure their healthy growth. Here are some important steps to follow:
1. Transplant the rooted cuttings
After your cuttings have developed a strong root system, carefully transplant them into individual pots or containers. Use a well-draining potting mix to prevent waterlogged roots and promote healthy growth.
2. Provide appropriate lighting
Place your transplanted cuttings in an area where they can receive bright, indirect light. Avoid direct sunlight as it can cause damage to the delicate new growth. A sunny windowsill or a spot under grow lights can provide the necessary lighting conditions.
3. Maintain proper humidity
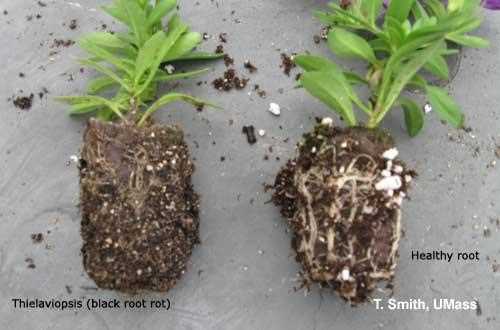
Rooted cuttings benefit from high humidity levels, which can be achieved by placing them in a humidity dome or covering them with a plastic bag. This helps prevent excessive moisture loss through transpiration and promotes successful acclimatization.
4. Watering
Keep the soil evenly moist, but do not overwater. Overwatering can lead to the development of root rot and other fungal diseases. Water the plants when the top inch of soil feels slightly dry to the touch.
5. Fertilization
Begin fertilizing your rooted cuttings once they have been transplanted and have adjusted to their new environment. Use a balanced liquid fertilizer diluted according to the manufacturer’s instructions. Fertilize every two weeks during the growing season.
6. Pruning
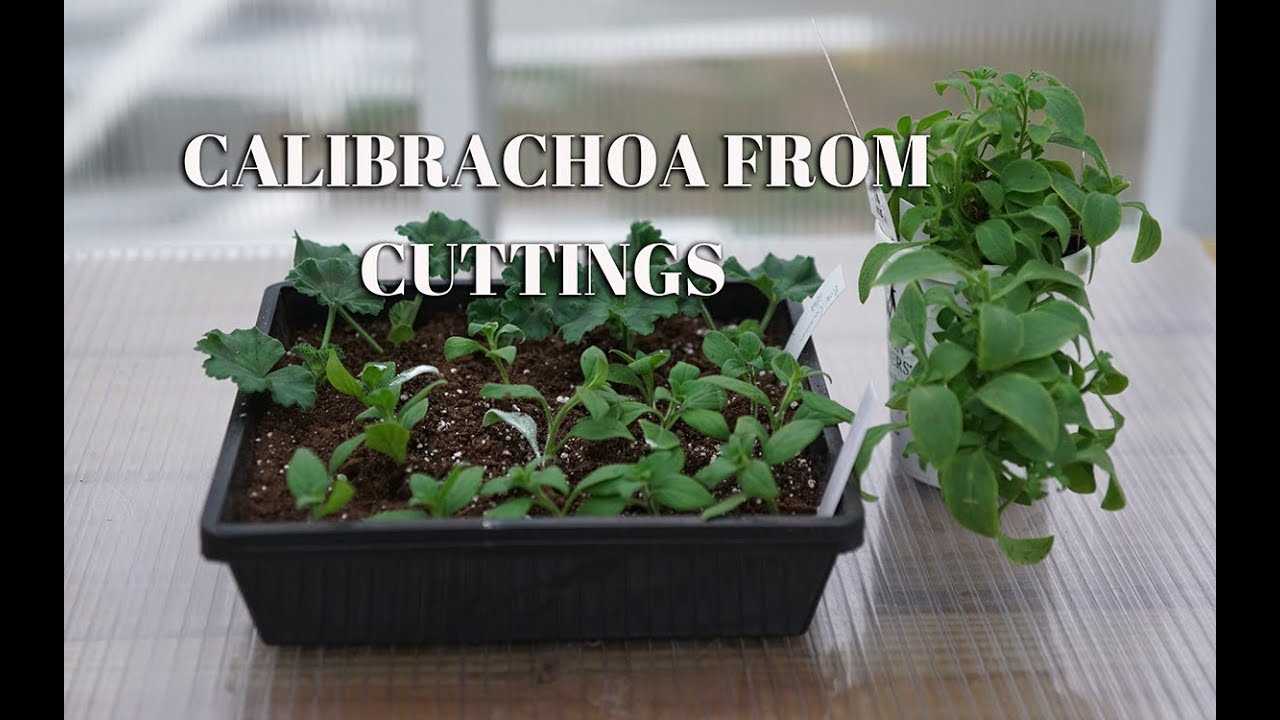
Regularly pinch back the growing tips of your cuttings to encourage bushier growth and more flowers. This will help create a more compact and attractive plant.
7. Monitor for pests and diseases
Inspect your cuttings regularly for any signs of pests, such as aphids or spider mites, and treat them promptly if necessary. Also, keep an eye out for any signs of diseases, such as leaf spots or wilting, and take appropriate measures to prevent their spread.
By following these care tips, your rooted cuttings should continue to grow and thrive, eventually producing beautiful flowers that will make a stunning addition to your garden or containers.
Questions and Answers:
Is it possible to propagate calibrachoa from cuttings?
Yes, it is possible to propagate calibrachoa from cuttings. In fact, it is one of the most common methods of propagating this plant.
What is the best time to take cuttings from calibrachoa?
The best time to take cuttings from calibrachoa is in the spring or early summer, when the plant is actively growing.
How should I prepare the cutting before planting?
Before planting the cutting, you should remove any flowers or buds from the stem, as they can divert energy away from root development. You should also dip the cut end of the stem in rooting hormone to promote root growth.
What are the best conditions for rooting calibrachoa cuttings?
The best conditions for rooting calibrachoa cuttings include a well-draining soil mixture, bright, indirect light, and a warm and humid environment. It is also important to mist the cuttings regularly to keep them moist.
How long does it take for calibrachoa cuttings to root?
Calibrachoa cuttings usually take about 2-3 weeks to root. However, it is important to note that the rooting time can vary depending on the environmental conditions and the health of the cutting.


