- Removing Spent Flowers
- Cutting Back Foliage
- When to Cut Back
- How to Cut Back
- After Care
- Deadheading and Bulb Division
- Deadheading
- Bulb Division
- Providing Adequate Watering
- Fertilizing for Next Year
- Monitoring for Pests and Diseases
- Pests:
- Diseases:
- Storing the Bulbs
- 1. Cut Back the Foliage
- 2. Lift the Bulbs
- 3. Clean the Bulbs
- 4. Dry the Bulbs
- 5. Store the Bulbs
- 6. Check the Bulbs
- 7. Replant the Bulbs
- Preparing for Next Year’s Bloom
- 1. Deadhead the flowers
- 2. Allow the foliage to photosynthesize
- 3. Provide adequate water and nutrients
- 4. Protect the bulbs during winter
- 5. Consider lifting and storing the bulbs
- 6. Plan for optimal planting time
- 7. Consider bulb division
- Questions and Answers:
- What should I do with my hyacinth after it has finished flowering?
- Can I remove the leaves of my hyacinth after it blooms?
- How often should I water my hyacinth after it finishes flowering?
- Can I replant my hyacinth after it blooms?
- Do I need to fertilize my hyacinth after it finishes flowering?
- What should I do if my hyacinth leaves turn yellow after flowering?
- Videos: What to do With a Hyacinth After it Blooms

The hyacinth is a beautiful spring flower that adds color and fragrance to any garden or indoor space. However, once the flowers have finished blooming, many people are unsure of how to care for their hyacinth to ensure its continued success. In this article, we will explore the steps you can take to properly care for your hyacinth after it blooms.
After the hyacinth has finished blooming, it is important to remove the spent flowers to prevent the plant from expending unnecessary energy on seed production. This process, known as deadheading, involves cutting off the faded flower stalks just above the base of the plant. By doing this, you will encourage the hyacinth to put its energy into developing a strong bulb for next season.
In addition to deadheading, it is important to continue watering your hyacinth regularly throughout the growing season. Hyacinths prefer well-drained soil, so be sure not to overwater. Additionally, it is important to feed your hyacinth with a balanced fertilizer every four to six weeks to provide it with the necessary nutrients to thrive.
Come the end of the growing season, you may notice that the leaves of your hyacinth begin to turn yellow and wither. This is a natural process as the plant prepares for dormancy. It is important not to cut back the leaves until they are completely yellow and dry. This allows the plant to continue absorbing sunlight and nutrients, which will be stored in the bulb for next year’s growth.
In conclusion, proper care of your hyacinth after it blooms is crucial for its long-term success. By deadheading, watering, fertilizing, and allowing the leaves to wither naturally, you can ensure a healthy and vibrant hyacinth for years to come.
Removing Spent Flowers
After your hyacinth has finished flowering, it is important to remove the spent flowers to promote the health and growth of the plant. Removing spent flowers can also prevent the hyacinth from going to seed and producing unwanted offspring.
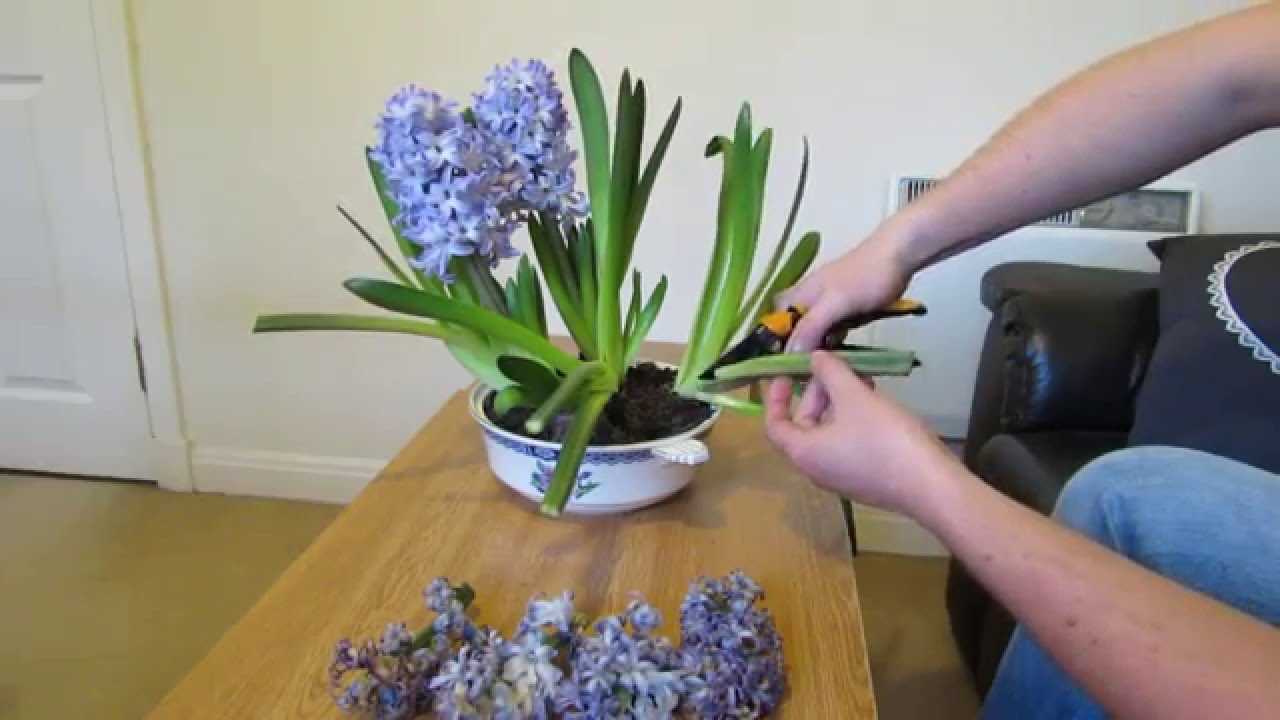
To remove the spent flowers, gently grasp the stem of the flower and follow it down to where it meets the leaves. Using a sharp pair of scissors or garden shears, make a clean cut at this point to remove the entire flower stem.
Be careful not to damage the leaves or other healthy parts of the plant when removing the spent flowers. It is best to cut the stem as close to the base of the plant as possible without harming the surrounding foliage.
Once you have removed all the spent flowers from your hyacinth, you can dispose of them in your compost pile or bin. Alternatively, you can simply discard them in the trash.
Removing spent flowers not only improves the appearance of your hyacinth plant, but it also redirects the plant’s energy into producing new foliage and bulb growth. This will help ensure a healthy and thriving hyacinth for the following year’s bloom.
Cutting Back Foliage
- After your hyacinth has finished blooming, it’s important to take care of its foliage to ensure the bulb’s health for the next year.
- Once the flowers have faded and wilted, you can start cutting back the foliage.
When to Cut Back
- Wait until the hyacinth’s foliage turns yellow and begins to die back naturally before cutting it back. This usually occurs about 6-8 weeks after blooming.
- It’s important to allow the foliage to die back naturally because it helps in the process of storing energy in the bulb for the next blooming season.
How to Cut Back
- Use a clean pair of pruning shears or scissors to cut back the foliage.
- Start by removing any yellow or brown leaves or stems. Avoid cutting any still-green foliage.
- Make your cuts close to the base of the plant, leaving about an inch of the stem above the bulb.
- Remove any dead flower stalks as well.
- Dispose of the foliage in a compost pile or bin. Do not leave it on the ground, as it may harbor pests or diseases.
After Care
- Once you have cut back the foliage, it’s important to continue providing your hyacinth with proper care.
- Water the bulb occasionally during the summer months, ensuring the soil doesn’t dry out completely.
- Continue to provide your hyacinth with a well-draining soil and a sunny location to ensure proper growth.
- If you live in a cold climate, consider lifting the hyacinth bulbs in the fall and storing them in a cool, dry place until it’s time to plant them again in the spring.
| Benefits of Cutting Back Foliage |
|---|
| 1. Promotes bulb health: Cutting back the foliage allows the bulb to store energy and nutrients for future growth and blooming. |
| 2. Prevents disease and pests: Removing dead foliage reduces the risk of pests and diseases that can affect the bulb. |
| 3. Aesthetically pleasing: Cutting back the foliage tidies up the appearance of the plant and the garden. |
Deadheading and Bulb Division
After your hyacinth has finished blooming, there are a few important steps you should take to ensure its continued health and future growth. Two important practices to consider are deadheading and bulb division.
Deadheading
Deadheading refers to the removal of spent flowers from the plant. This process encourages the hyacinth to redirect its energy towards producing new growth and storing nutrients in the bulb for the next blooming season. To deadhead a hyacinth, simply use clean, sharp pruners or scissors to cut off the faded or wilted flowers at the base of the stem. Be careful not to cut off any healthy foliage or emerging flower buds.
Bulb Division
Over time, hyacinth bulbs can become overcrowded and produce smaller, less vibrant flowers. Bulb division is a process that involves separating the mature bulbs into smaller groups, allowing each bulb to have more space to grow and access to nutrients. This can help rejuvenate the plant and improve its overall health and blooming performance.
Here is a step-by-step guide to dividing hyacinth bulbs:
- Wait until the foliage of the hyacinth has completely died back. This usually occurs in late spring or early summer.
- Gently dig up the bulb clump using a garden fork or shovel, being careful not to damage the bulbs.
- Brush off any excess soil from the bulbs, and separate them into individual bulbs or smaller groups by gently pulling them apart.
- Inspect each bulb for signs of damage or disease. Discard any bulbs that are soft, rotting, or otherwise unhealthy.
- Replant the divided bulbs immediately in a new location or container, following the same planting guidelines as for the original bulbs.
- Water the newly planted bulbs thoroughly, and continue to provide regular care and maintenance throughout the growing season.
By deadheading and dividing your hyacinth bulbs, you can help ensure their continued health, longevity, and beautiful blooms for many years to come.
Providing Adequate Watering
Proper watering is essential for the health and longevity of your hyacinth after it blooms. Here are some guidelines to follow:
- Watering frequency: Hyacinths require regular watering, especially during their active growth period. Water the plant thoroughly whenever the top inch of soil feels dry to the touch.
- Watering method: To prevent waterlogging and root rot, it’s best to water hyacinths from the bottom. Place the pot in a tray or saucer filled with water and allow the plant to absorb water through the drainage holes in the pot’s bottom.
- Drainage: Ensure that the pot has proper drainage holes to prevent water from accumulating in the soil. Good drainage is crucial to prevent root rot.
Here are some additional factors to consider when watering your hyacinth:
- Temperature: Hyacinths prefer cool temperatures but are sensitive to frost. Watering the plant early in the morning allows the excess moisture to evaporate during the day, preventing the soil from staying too damp and causing fungal diseases.
- Fertilizer and watering: When using fertilizer, make sure to water the hyacinth plant before applying the fertilizer. This will help prevent root burn and ensure that the nutrients are evenly distributed in the soil.
Remember to observe your hyacinth closely and adjust your watering routine accordingly. Too much or too little water can damage the plant, so it’s important to strike the right balance.
Fertilizing for Next Year
Properly fertilizing your hyacinth after it blooms is essential to ensure healthy growth and beautiful flowers the following year. Here are some tips on how to fertilize your hyacinth for optimum results:
- Wait until the foliage dies back: After your hyacinth has finished blooming, allow the foliage to die back naturally. This process helps the bulb store energy for next year’s growth.
- Cut back the foliage: Once the foliage has turned yellow and withered, you can trim it back to about an inch above the soil level. Be careful not to damage the bulb.
- Apply a balanced fertilizer: Choose a slow-release fertilizer with a balanced N-P-K ratio (nitrogen, phosphorus, and potassium). This will provide your hyacinth bulb with the essential nutrients it needs for healthy growth.
- Follow the manufacturer’s instructions: Read the instructions on the fertilizer package carefully for the recommended amount and application method. Different fertilizers may have specific guidelines.
- Apply the fertilizer: Sprinkle the fertilizer evenly around the area where the bulb is planted. Avoid placing the fertilizer directly on top of the bulb to prevent burning.
- Water thoroughly: After applying the fertilizer, water the area thoroughly to help activate the nutrients and prevent fertilizer burn.
- Mulch the soil: Adding a layer of organic mulch, such as compost or shredded leaves, around the bulb can help conserve moisture and regulate soil temperature. This will create an ideal environment for the bulb to grow.
- Monitor soil moisture: Throughout the growing season, keep an eye on the soil moisture and water as needed. Hyacinths prefer moist but well-draining soil.
- Repeat fertilization: For best results, fertilize your hyacinth once a year, in early spring before new growth appears. This will continue to provide the nutrients your hyacinth needs for healthy blooms.
By following these fertilizing tips, you can ensure that your hyacinth bulb remains healthy and produces beautiful flowers year after year.
Monitoring for Pests and Diseases
After your hyacinth has finished flowering, it is important to monitor for pests and diseases to ensure the health of the plant. Pests and diseases can damage the foliage and bulb, leading to the decline of the plant. Here are some common pests and diseases to look out for and how to manage them:
Pests:
- Aphids: These small, soft-bodied insects can cluster on the leaves and stems of the hyacinth, sucking the sap from the plant. To manage aphids, you can spray the plant with insecticidal soap or use a strong jet of water to wash them off.
- Spider mites: These tiny pests can cause small yellow spots on the leaves and fine webbing. To control spider mites, you can spray the plant with a mixture of water and neem oil or use predatory mites to feed on them.
- Slugs and snails: These slimy creatures can eat through the leaves and bulbs of the hyacinth. To deter slugs and snails, you can remove any hiding places in the garden, such as logs or debris, and use organic slug pellets around the plant.
Diseases:
- Gray mold: This fungal disease can cause brown spots on the leaves and flowers of the hyacinth. To manage gray mold, you should remove any infected plant material and improve the airflow around the plant by thinning out nearby vegetation.
- Fusarium basal rot: This fungal disease can cause the base of the hyacinth bulb to rot and eventually the whole plant can collapse. To prevent fusarium basal rot, it is important to plant hyacinth bulbs in well-drained soil and not overwater them.
- Botrytis blight: This fungal disease can cause brown spots on the foliage and flowers of the hyacinth. To control botrytis blight, you should remove any infected plant material and avoid overhead watering that can promote the spread of the disease.
By regularly monitoring your hyacinth for pests and diseases, you can catch any issues early and take appropriate actions to prevent them from spreading and damaging your plant. Healthy hyacinths will reward you with beautiful blooms year after year.
Storing the Bulbs
Once your hyacinth has finished blooming, it’s important to properly store the bulbs so that they can re-bloom the following year. Here are some steps to help you store your hyacinth bulbs:
1. Cut Back the Foliage
After the flowers have faded, allow the foliage to turn yellow and wither naturally. Once this happens, you can cut back the foliage to about 1 inch above the soil level.
2. Lift the Bulbs

Using a garden fork or trowel, carefully lift the hyacinth bulbs from the ground. Be gentle to avoid damaging the bulbs.
3. Clean the Bulbs

Gently remove any excess soil from the bulbs. You can use a soft brush or your hands to do this. Avoid washing the bulbs with water, as this can cause them to rot.
4. Dry the Bulbs

Place the bulbs in a well-ventilated area with good air circulation to allow them to dry. This will help prevent any fungal or bacterial growth. Leave the bulbs to dry for about 1-2 weeks.
5. Store the Bulbs
Once the bulbs are completely dry, store them in a cool and dry location. You can use a paper bag, a mesh bag, or a wooden box for storage. Make sure to label the storage container with the variety and color of the hyacinth bulbs.
6. Check the Bulbs
Periodically check the bulbs during the storage period to ensure they are staying dry and free from any signs of rot or disease. If you notice any issues, remove the affected bulbs to prevent spreading.
7. Replant the Bulbs
In the autumn, when the soil temperature drops to around 55°F (13°C), you can replant the hyacinth bulbs in your garden. Choose a well-draining location with full sun or partial shade.
By following these steps, you can successfully store your hyacinth bulbs and enjoy their beautiful blooms year after year.
Preparing for Next Year’s Bloom
After your hyacinth has finished blooming for the season, it’s important to properly care for the plant to ensure it will bloom again next year. Here are some steps you can take to prepare your hyacinth for next year’s bloom:
1. Deadhead the flowers
Once the flowers have faded and started to wither, use sharp scissors or garden shears to remove the flower stalks from the plant. This process, known as deadheading, encourages the plant to put its energy into storing nutrients for next year’s bloom instead of producing seeds.
2. Allow the foliage to photosynthesize
While it may be tempting to cut back the foliage after the flowers are gone, it’s important to allow the leaves to continue photosynthesizing. This process helps the plant gather energy and store it in the bulb for next year’s bloom. Only remove the foliage once it has turned yellow and withered completely.
3. Provide adequate water and nutrients
Hyacinths need moisture and nutrients to thrive and prepare for the next blooming season. Water the plant regularly, keeping the soil moist but not waterlogged. You can also apply a slow-release fertilizer or a balanced water-soluble fertilizer according to the package instructions to provide the necessary nutrients for growth.
4. Protect the bulbs during winter
During winter, it’s important to protect the hyacinth bulbs from frost and extreme temperatures. If you live in an area with cold winters, consider adding a layer of mulch or straw around the plants to insulate the soil and protect the bulbs. This will help prevent the bulbs from freezing and ensure their survival until the next growing season.
5. Consider lifting and storing the bulbs
In some regions with extremely cold winters, it may be necessary to lift and store the hyacinth bulbs indoors during the winter months. If you choose to do this, wait until the foliage has completely withered before carefully lifting the bulbs from the ground. Clean off any excess soil, and store the bulbs in a cool, dry place until it’s time to replant them in the spring.
6. Plan for optimal planting time
When preparing for next year’s bloom, it’s important to plan for the optimal planting time. Hyacinth bulbs are typically planted in the fall, around 6-8 weeks before the ground freezes. Consult your local gardening resources or a gardening expert to determine the best planting time for your specific region.
7. Consider bulb division
If your hyacinth bulbs have become overcrowded and are not blooming as well as they used to, you may consider dividing the bulbs to rejuvenate the plant. This should be done every 3-4 years, preferably in the fall when the bulbs are lifted for storage. Carefully separate the small bulbs from the larger ones, making sure each division has enough roots intact.
By following these care tips, you can ensure that your hyacinth will have the best chance of blooming beautifully again next year.
Questions and Answers:
What should I do with my hyacinth after it has finished flowering?
After your hyacinth has finished flowering, you should cut off the flower stalk but leave the leaves intact. This allows the plant to gather energy for next year’s blooms. Place the potted hyacinth in a sunny location and continue to water it regularly.
Can I remove the leaves of my hyacinth after it blooms?
No, you should not remove the leaves of your hyacinth after it blooms. The leaves are essential for the plant to gather energy and nutrients for the next year’s blooming. Let the leaves die back naturally.
How often should I water my hyacinth after it finishes flowering?
You should continue to water your hyacinth regularly after it finishes flowering. Make sure the soil is moist but not waterlogged. Hyacinths prefer well-draining soil, so be careful not to overwater.
Can I replant my hyacinth after it blooms?
Yes, you can replant your hyacinth after it blooms. If you want to keep it as a potted plant, choose a slightly larger pot and replant it with fresh potting soil. If you want to plant it in the ground, choose a location with well-draining soil and dig a hole deep enough to accommodate the bulb.
Do I need to fertilize my hyacinth after it finishes flowering?
It is not necessary to fertilize your hyacinth after it finishes flowering. The plant stores enough energy in the bulb to bloom for several years. However, if you want to give it an extra boost, you can apply a balanced fertilizer according to the package instructions.
What should I do if my hyacinth leaves turn yellow after flowering?
If your hyacinth leaves turn yellow after flowering, it is a sign that the plant is entering its dormant phase. This is a natural process, and you should not be alarmed. Reduce watering and let the leaves die back naturally. You can cut them off once they have turned completely brown.


