- Growing Hydrangea domestic
- Choosing the right location
- Planting hydrangeas
- Watering and fertilizing
- Pruning hydrangeas
- Pests and diseases
- Conclusion
- Choosing the Right Location
- Consider the climate
- Sun exposure
- Soil conditions
- Space requirements
- Protection from strong winds
- Soil preparation for Hydrangea domestic
- 1. Soil pH
- 2. Soil texture
- 3. Soil fertility
- 4. Mulching
- 5. Watering
- 6. Maintenance
- Watering and fertilizing
- Watering:
- Fertilizing:
- Pruning and shaping
- 1. Timing:
- 2. Removing dead wood:
- 3. Maintaining shape:
- 4. Deadheading:
- 5. Pruning for specific varieties:
- 6. Sterilize tools:
- Propagation methods for Hydrangea domestic
- 1. Division
- 2. Stem cuttings
- 3. Layering
- Common pests and diseases
- Pests
- Diseases
- Harvesting and Preserving Flowers
- Tips for displaying and arranging flowers
- 1. Choose the right vase or container
- 2. Preparing the flowers
- 3. Play with colors and textures
- 4. Create a focal point
- 5. Consider the style and occasion
- 6. Keep it balanced
- 7. Change the water regularly
- Q&A:
- What is the best time to plant Hydrangea domestic?
- How often should I water Hydrangea domestic?
- Should I prune Hydrangea domestic?
- Can I propagate Hydrangea domestic from cuttings?
- Why are the leaves of my Hydrangea domestic turning yellow?
- How can I change the color of the flowers on my Hydrangea domestic?
- Video: Growing Hydrangeas in Containers | Planting, Care & Overwintering
Hydrangeas are beautiful flowering plants that can add a touch of elegance and color to any garden or landscape. With their lush blooms and vibrant colors, they are a popular choice among gardeners and flower enthusiasts. However, caring for and propagating hydrangeas can be a bit challenging, especially for beginners. In this article, we will provide some useful tips and guidelines on how to properly care for and propagate hydrangeas.
First and foremost, it is important to understand the specific needs of hydrangeas in terms of light, water, and soil. Hydrangeas thrive best in well-drained soil that is rich in organic matter. They prefer a slightly acidic soil with a pH level of 5.5 to 6.5. It is also important to ensure that hydrangeas receive adequate sunlight, but also have some shade during the hottest hours of the day.
When it comes to watering hydrangeas, it is crucial to find the right balance. These plants require regular watering, especially during the summer months, to ensure that the soil remains moist. However, overwatering can lead to root rot and other problems, so it is important to water them moderately and avoid waterlogging.
Propagating hydrangeas can be done in several ways, including through cuttings, layering, and seed sowing. One of the most common methods is through stem cuttings. This involves taking a cutting from a healthy and mature hydrangea plant and rooting it in a suitable rooting medium. The cutting should be about 4-6 inches long and should have at least two leaf nodes. The cutting should be inserted into the rooting medium and kept in a warm and humid environment until it develops roots.
Overall, caring for and propagating hydrangeas requires some knowledge and effort, but the end result is definitely worth it. With proper care, these beautiful flowering plants can thrive and bring joy to any garden or landscape.
Growing Hydrangea domestic

Hydrangea domestica, commonly known as hydrangea, is a beautiful flowering plant that is popular in gardens and landscapes. With their large, showy blooms and lush green foliage, hydrangeas can bring a touch of elegance to any garden.
Choosing the right location
When growing hydrangeas, it is important to choose the right location to ensure their optimum growth and blooming. Hydrangeas prefer a location with partial shade, where they can receive a few hours of direct sunlight in the morning or late afternoon. They also prefer well-draining soil that is rich in organic matter.
Planting hydrangeas
Hydrangeas should be planted in spring or fall, when the weather is cooler and there is less risk of transplant shock. Dig a hole that is about twice the size of the root ball and loosen the soil in the bottom of the hole. Place the plant in the hole, making sure that the top of the root ball is level with or slightly above the soil surface. Fill the hole with soil and press it down gently to eliminate air pockets.
Watering and fertilizing
Hydrangeas require regular watering, especially during dry spells. Water deeply and thoroughly, making sure that the soil is evenly moist but not waterlogged. Avoid overhead watering, as this can lead to fungal diseases. In terms of fertilizing, hydrangeas benefit from a balanced slow-release fertilizer applied in early spring and again in mid-summer.
Pruning hydrangeas
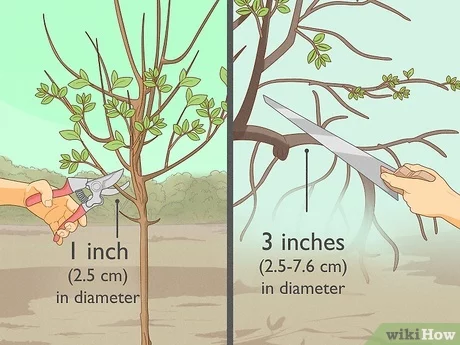
Pruning hydrangeas can help maintain their shape and encourage better blooming. The timing and method of pruning depend on the type of hydrangea. For macrophylla hydrangeas, which bloom on old wood, prune after flowering by removing dead or damaged wood and thinning out overcrowded stems. For paniculata and arborescens hydrangeas, which bloom on new wood, prune in late winter or early spring, removing about one-third of the old stems.
Pests and diseases
While hydrangeas are generally healthy plants, they can be susceptible to a few pests and diseases. Common pests include aphids, spider mites, and slugs. To control these pests, use insecticidal soap or neem oil. Hydrangeas can also be prone to powdery mildew and leaf spot diseases. To prevent these diseases, avoid overhead watering and provide good air circulation around the plants.
Conclusion
Growing hydrangeas can be a rewarding experience, as these plants can add beauty and charm to any garden. By providing the right growing conditions, regular watering and fertilizing, and proper pruning, you can enjoy the stunning blooms of hydrangea domestica for years to come.
Choosing the Right Location
Choosing the right location for your hydrangea is essential for its growth and overall health. Here are some tips to help you make the best choice:
Consider the climate
Hydrangeas thrive in moderate temperatures and prefer a climate that is not too hot or too cold. They generally do well in USDA hardiness zones 3 to 9. If you live in an extreme climate, you may need to provide some extra care to protect your hydrangeas.
Sun exposure
Most hydrangeas prefer partial shade or filtered sunlight. Too much direct sunlight can cause the leaves to wilt, while too little sunlight can result in reduced flowering. Choose a location that receives morning sun and afternoon shade for optimal results.
Soil conditions
Hydrangeas thrive in moist, well-drained soil. They prefer a slightly acidic soil with a pH level between 5.5 and 6.5. Avoid planting them in heavy clay soil that retains water, as it can lead to root rot. If your soil is too alkaline, you can amend it with sulfur or other soil acidifiers.
Space requirements
Hydrangeas can grow quite large, so make sure to provide enough space for them to spread out. Consider the mature size of the specific hydrangea variety you are planting and plan accordingly. Leaving at least 3 to 4 feet of space between hydrangeas will allow for proper air circulation and prevent overcrowding.
Protection from strong winds
Hydrangeas have delicate stems and leaves that can easily get damaged by strong winds. Choose a location that is sheltered from strong winds or provide some form of windbreak, such as a fence or a row of taller plants, to protect your hydrangeas.
By considering these factors, you can choose the right location for your hydrangea plants, ensuring their healthy growth and abundant flowering.
Soil preparation for Hydrangea domestic
Proper soil preparation is essential for the healthy growth and development of Hydrangea domestic. Here are some tips to help you create the ideal soil conditions for your hydrangeas:
1. Soil pH
Hydrangeas prefer slightly acidic soil with a pH range of 5.5 to 6.5. Test the soil pH using a soil testing kit and make necessary adjustments if needed. If your soil is alkaline, you can lower the pH by adding sulfur or peat moss. For acidic soil, you can add lime to raise the pH.
2. Soil texture
Hydrangeas thrive in well-draining soil that retains moisture without becoming waterlogged. Improve soil drainage by adding organic matter such as compost or well-rotted manure. This will also help to enhance the soil’s ability to hold moisture during dry periods.
3. Soil fertility
Hydrangeas require a fertile soil that is rich in organic matter. Before planting, incorporate compost or aged manure into the soil to provide a nutrient-rich environment for the roots. You can also use a balanced slow-release fertilizer specifically formulated for hydrangeas to provide ongoing nutrients.
4. Mulching
Apply a layer of mulch around the base of the plant to help retain moisture, regulate soil temperature, and suppress weed growth. Use organic mulch such as wood chips, straw, or shredded leaves. Avoid piling the mulch directly against the stem of the plant to prevent moisture-related issues.
5. Watering
Hydrangeas require regular watering, especially during hot, dry periods. Ensure the soil is consistently moist, but not waterlogged. Water deeply at the base of the plant to encourage root growth. Avoid overhead watering, as this can lead to disease.
6. Maintenance
Regularly monitor the soil condition around your hydrangeas and make any necessary adjustments. Test the soil pH annually and make amendments as needed. Keep the soil well-mulched to maintain moisture and suppress weeds. Consider applying a balanced slow-release fertilizer in spring and mid-summer to provide ongoing nutrients.
By following these soil preparation tips, you can create an optimal growing environment for your Hydrangea domestic and ensure their health and vitality.
Watering and fertilizing
Proper watering and fertilizing are essential for the health and growth of hydrangea plants. Here are some tips to ensure your hydrangeas get the right amount of water and nutrients:
Watering:

- Frequency: Hydrangeas require regular watering, especially during hot and dry periods. Water deeply and slowly to ensure the water reaches the root zone.
- Timing: Water hydrangeas in the morning or late afternoon to avoid evaporation and excessive moisture on the leaves, which can lead to diseases.
- Moisture level: The soil should be moist but not waterlogged. Hydrangeas prefer well-draining soil, so make sure the water doesn’t accumulate around the roots.
- Avoid overhead watering: Hydrangeas don’t like to be sprayed or misted from overhead. Instead, direct the water towards the base of the plant.
Fertilizing:
- Timing: Fertilize hydrangeas in early spring, just as new growth begins. You can also apply a slow-release fertilizer in late spring or early summer to provide continuous nutrients.
- Types of fertilizers: Use a balanced, water-soluble fertilizer with equal amounts of nitrogen (N), phosphorus (P), and potassium (K). Alternatively, you can use a fertilizer specifically formulated for acid-loving plants if you have blue hydrangeas.
- Application: Follow the instructions on the fertilizer package for the appropriate dosage and application method. Generally, it is recommended to spread the fertilizer evenly around the base of the plant.
- Avoid over-fertilizing: Too much fertilizer can cause excessive foliage growth and reduce flower production. Always follow the recommended dosage.
Remember, hydrangeas have different moisture and nutrient requirements depending on the variety and growing conditions. Monitor the soil moisture and regularly check the plants for any signs of nutrient deficiencies or excesses. Adjust your watering and fertilizing practices accordingly to ensure your hydrangea plants thrive.
Pruning and shaping
Pruning is an important part of hydrangea care, as it helps to maintain the plant’s shape, promote healthy growth, and enhance flower production. While the specific pruning techniques may vary depending on the hydrangea variety, here are some general tips to keep in mind:
1. Timing:
The best time to prune hydrangeas is in late winter or early spring, before new growth begins. This allows the plant to allocate its energy towards developing new shoots and flowers.
2. Removing dead wood:
Start by removing any dead or damaged wood, as well as any old or weak stems. This will help improve the plant’s overall vigor and appearance.
3. Maintaining shape:
Next, focus on shaping the hydrangea by selectively pruning and thinning the branches. Remove any crossing or overcrowded branches to improve airflow and reduce the risk of disease.
4. Deadheading:
After the hydrangea has finished flowering, it’s a good idea to deadhead the spent blooms. This not only improves the plant’s appearance but also encourages it to produce more flowers in the future.
5. Pruning for specific varieties:

Some hydrangea varieties, such as the mophead or lacecap types, bloom on old wood. These should be pruned immediately after flowering to avoid cutting off next year’s buds. Other varieties, like the panicle hydrangea, bloom on new wood and can be pruned more aggressively in early spring.
6. Sterilize tools:
Always remember to sterilize your pruning tools before and after use to prevent the spread of diseases. Simply wiping the blades with rubbing alcohol or a bleach solution should be sufficient.
By following these pruning and shaping tips, you can keep your hydrangea plants healthy, attractive, and blooming abundantly year after year.
Propagation methods for Hydrangea domestic
Hydrangea domestic can be propagated through several methods, including division, stem cuttings, and layering. Each method has its own advantages and may be more suitable for different circumstances.
1. Division
Division is one of the easiest and most common methods of propagating Hydrangea domestic. It involves dividing the plant into smaller sections, each with its own roots and shoots. Here’s how to do it:
- Choose a mature Hydrangea domestic plant.
- Dig up the entire plant and gently separate the roots and shoots into individual sections.
- Ensure that each section has enough roots and shoots to survive on its own.
- Plant the divided sections in well-drained soil.
- Water the newly planted sections regularly and provide them with proper sunlight and care.
2. Stem cuttings
Propagation through stem cuttings is another effective method for growing new Hydrangea domestic plants. Follow these steps to propagate through stem cuttings:
- Select a healthy stem from the parent plant.
- Cut a 6-8 inch section from the stem, making sure to include at least two or three leaf nodes.
- Remove the leaves from the bottom half of the cutting.
- Dip the cut end of the stem into a rooting hormone to encourage root growth.
- Plant the cutting in a well-draining potting medium, making sure that at least one leaf node is below the surface.
- Place the pot in a warm and humid environment, and keep the soil moist but not waterlogged.
- After a few weeks, the cutting should develop roots and can be transplanted into a larger container or directly into the garden.
3. Layering
Layering is a propagation method that involves bending a low, flexible stem of the parent plant and burying it in the soil, allowing it to root while still attached to the parent plant. Here’s how to propagate Hydrangea domestic through layering:
- Select a healthy stem with a flexible shoot.
- Bend the selected shoot and secure it to the ground using a U-shaped wire or a stone.
- Cover the buried section of the stem with soil, leaving the tip of the shoot exposed.
- Water the soil regularly to keep it moist.
- After a few months, the buried section of the stem should develop roots.
- Once the new roots are established, sever the rooted stem from the parent plant and transplant it to a new location.
These propagation methods can be successful with proper care and attention. Experiment with different methods and see which one works best for you.
Common pests and diseases
Pests
- Aphids: These small insects feed on the sap of the hydrangea, causing wilted leaves and stunted growth. They can be controlled by spraying the plant with insecticidal soap or by introducing natural predators like ladybugs.
- Spider mites: These tiny pests spin webs on the undersides of the leaves and suck the plant sap, causing yellowed and speckled foliage. Regularly misting the leaves with water can help prevent infestations, and if necessary, insecticidal soap can be used.
- Scale insects: These pests appear as small, raised bumps on the stems and leaves of the hydrangea. They can be controlled by gently scrubbing them off with a soft brush or by using insecticidal soap.
Diseases

- Powdery mildew: This fungal disease manifests as a white powdery coating on the leaves, causing them to become distorted and eventually die. To prevent powdery mildew, ensure good air circulation around the plant and avoid overhead watering. Fungicides can also be used to treat the disease.
- Leaf spot: Leaf spot is characterized by brown or black spots on the leaves, often with a yellow halo around them. Remove infected leaves and improve air circulation to prevent the spread of this fungal infection.
- Root rot: Overwatering and poor drainage can lead to the development of root rot, which causes the roots to become mushy and black. To prevent root rot, ensure the hydrangea is planted in well-draining soil and water only when necessary.
Regularly inspecting your hydrangea for signs of pests or diseases and taking preventative measures can help ensure the health and beauty of your plant.
Harvesting and Preserving Flowers
- When harvesting hydrangea flowers, it’s best to choose blooms that have started to change color but are not fully open yet. This is when the flowers are at their peak and will retain their color and freshness longer.
- Using clean pruning shears, cut the stems at a 45-degree angle just above a set of leaves or a bud. This will encourage new growth and prevent the stem from rotting.
- It’s important to harvest hydrangea flowers in the morning when the blooms are well-hydrated. Avoid cutting flowers in the heat of the day or in the rain to ensure they stay fresh longer.
- Once the flowers are harvested, remove any leaves or foliage that will be below the water line. This will prevent bacterial growth and keep the water clean.
- Fill a bucket or vase with cool water and place the cut hydrangea stems in it immediately after harvesting. Let them sit in the water for a few hours to hydrate before arranging them.
Preserving hydrangea flowers can be done in several ways:
- Air-drying: To air-dry hydrangea flowers, hang them upside down in a cool, dark, and well-ventilated area. Make sure the blooms are not touching each other to prevent mold or rot. The flowers will dry naturally and retain their shape and color.
- Water drying: To preserve hydrangea flowers in water, remove any foliage that will be submerged, and place the stems in a vase with water. Let the water evaporate naturally over time until the flowers are completely dry. This method helps retain the vibrant color of the flowers.
- Glycerin: You can also preserve hydrangea flowers using glycerin. Mix one part glycerin with two parts water and submerge the stems in the solution. The glycerin will be absorbed by the flowers, keeping them soft and pliable while retaining their color.
With these harvesting and preserving tips, you can enjoy the beauty of hydrangea flowers long after they have been cut.
Tips for displaying and arranging flowers
Displaying and arranging flowers is a creative and enjoyable task that can enhance the beauty and ambiance of any space. Here are some tips to help you create stunning floral displays:
1. Choose the right vase or container
Select a vase or container that complements the flowers and the overall style you want to achieve. Consider the size, shape, and color of the vase – tall, cylindrical vases are great for long-stemmed flowers, while wide, shallow containers work well for low arrangements.
2. Preparing the flowers
Before arranging the flowers, remove any foliage that will be below the water level to prevent bacterial growth. Cut the stems at a diagonal angle to allow for better water absorption. Place the flowers in water with flower food to help prolong their freshness.
3. Play with colors and textures
Create visual interest by combining flowers with different colors, textures, and shapes. Mix larger blooms with smaller ones, and add foliage or filler flowers to create depth and variety in your arrangement.
4. Create a focal point
Choose one or two standout flowers as the focal point of your arrangement. Place them slightly higher than the other flowers to draw the eye and create a sense of balance and focus.
5. Consider the style and occasion

Think about the occasion and the style you want to convey with your floral arrangement. For a formal event, elegant and structured arrangements work well, while loose and organic arrangements are great for a more casual setting.
6. Keep it balanced
Aim for balance and symmetry in your floral arrangement. Distribute flowers evenly and fill any gaps with foliage or filler flowers. Ensure that your arrangement is neither too sparse nor overcrowded.
7. Change the water regularly
To keep your flowers fresh, change the water in the vase every couple of days. Trim the stems slightly each time to allow for better water absorption. This will help extend the life of your arrangement.
Remember, flower arranging is subjective, so don’t be afraid to experiment and let your creativity shine. With these tips in mind, you’ll be able to create stunning floral displays that bring beauty and joy to any space.
Q&A:
What is the best time to plant Hydrangea domestic?
The best time to plant Hydrangea domestic is in the spring or fall when the temperatures are cooler and the plant has a chance to establish its roots before the hot summer months.
How often should I water Hydrangea domestic?
Hydrangea domestic should be watered regularly during the growing season, especially during dry periods. It is important to keep the soil moist, but not waterlogged, as this can lead to root rot.
Should I prune Hydrangea domestic?
Yes, pruning Hydrangea domestic is important for maintaining its shape and promoting healthy growth. It is best to prune in late winter or early spring before new growth begins.
Can I propagate Hydrangea domestic from cuttings?
Yes, Hydrangea domestic can be propagated from cuttings. Take a 6-inch cutting from a healthy stem, remove the lower leaves, and dip the cut end in rooting hormone. Plant the cutting in a container filled with moist soil and keep it in a warm, humid environment until roots develop.
Why are the leaves of my Hydrangea domestic turning yellow?
The leaves of Hydrangea domestic can turn yellow due to a variety of reasons, including overwatering, nutrient deficiencies, or pest infestation. It is important to check the plant for any signs of stress and address the issue accordingly.
How can I change the color of the flowers on my Hydrangea domestic?
The color of the flowers on Hydrangea domestic can be changed by altering the pH of the soil. To achieve blue flowers, the soil should be acidic (pH below 7), and to get pink flowers, the soil should be alkaline (pH above 7). Adding aluminum sulfate for blue flowers or lime for pink flowers can help adjust the soil pH.
Video:
Growing Hydrangeas in Containers | Planting, Care & Overwintering
