- The Fascinating World of Lithops Species
- 1. Lithops Habitat
- 2. Lithops Colors and Patterns
- 3. Lithops Blooming
- 4. Lithops Care
- 5. Popular Lithops Species
- 6. Collecting Lithops Seeds
- 7. Propagating Lithops
- Conclusion
- Growing Lithops from Seeds: Step-by-Step Guide
- Essential Care Tips for Healthy Lithops
- Light:
- Watering:
- Soil and Potting:
- Temperature and Humidity:
- Fertilizing:
- Propagation:
- Pests and Diseases:
- Common Diseases and Pests: How to Protect Your Lithops
- Diseases
- Pests
- Preventing Diseases and Pests
- Propagation Techniques: Multiplying Your Lithops Collection
- 1. Leaf Cuttings
- 2. Division
- 3. Seed Propagation
- Creative Display Ideas for Showcasing Lithops
- Frequently Asked Questions about Lithops
- 1. What are Lithops?
- 2. How do I grow Lithops from seeds?
- 3. How often should I water Lithops?
- 4. Can Lithops thrive in low light conditions?
- 5. What are the common problems and diseases that affect Lithops?
- 6. Can Lithops be propagated through division?
- 7. How long do Lithops usually live?
- 8. Are Lithops toxic to pets?
- 9. Are there different species and varieties of Lithops?
- 10. Can Lithops be grown outdoors?
- Q&A:
- How do I grow Lithops from seeds?
- What kind of soil mix should I use for Lithops?
- How often should I water Lithops?
- Can I grow Lithops in direct sunlight?
- How do I propagate Lithops?
- What are the different species of Lithops?
- Do Lithops require any special care?
- Video: How to GROW and CARE for LITHOPS | Growing Succulents with LizK
Welcome to our comprehensive guide on lithops. Lithops, also known as “living stones,” are fascinating and unique succulents that are native to southern Africa. These small, slow-growing plants have evolved to resemble rocks and pebbles to camouflage themselves from predators and harsh desert conditions. Their ability to blend in with their surroundings makes them a popular choice for indoor gardeners looking to add a touch of the exotic to their homes.
In this guide, we will cover everything you need to know about growing lithops from seeds and caring for them to ensure they thrive in your environment. Whether you’re a beginner or an experienced succulent enthusiast, we’ve got you covered.
First, we’ll discuss the necessary steps for growing lithops from seeds, including preparing the soil, sowing the seeds, and providing the right conditions for germination. We’ll also provide tips on how to maximize your chances of success and avoid common pitfalls.
Next, we’ll delve into the care requirements for lithops, including proper watering, lighting, and temperature considerations. These plants have unique needs, and understanding how to meet them will ensure their long-term health and vibrancy. We’ll also touch on the importance of repotting and fertilizing to promote optimal growth.
“Lithops, with their distinct appearance and low-maintenance nature, have gained a devoted following among plant collectors and enthusiasts. Their small size and ability to thrive in dry, arid conditions make them a perfect choice for those who want a touch of the desert in their homes.”
Lastly, we’ll explore some of the different species of lithops and highlight their unique characteristics. From the popular Lithops lesliei to the rare Lithops schwantesii, this section will provide insight into the diverse world of lithops and help you choose the perfect variety for your collection.
Whether you’re looking to start growing lithops from seeds or already have a few plants in your care, this comprehensive guide will equip you with the knowledge and tools to successfully grow, care for, and appreciate these remarkable succulents. Let’s dive in!
The Fascinating World of Lithops Species
Lithops, also known as living stones, are succulent plants that are native to the arid regions of southern Africa. These plants are known for their unique and intriguing appearance, which resembles small stones or pebbles. There are over 40 known species of lithops, each with its own distinct characteristics and beauty.
1. Lithops Habitat
Lithops species can be found in various habitats, including deserts, grasslands, and rocky areas. They have adapted to survive in harsh conditions by blending in with their surroundings and storing water in their bulbous leaves. Their ability to mimic the appearance of stones helps them avoid being eaten by animals and provides protection from the scorching sun.
2. Lithops Colors and Patterns
One of the most fascinating aspects of lithops species is their wide range of colors and intricate patterns. Some lithops have solid colors, such as green, brown, or grey, while others have intricate patterns that resemble mosaics or camouflage. The patterns help lithops blend in with their natural environment and provide additional protection from predators.
3. Lithops Blooming
Lithops plants produce beautiful flowers, usually in shades of yellow, white, or pink. The flowers emerge from the center of the plant and can stay in bloom for several days. However, the blooming period is relatively short, and it can be challenging to get lithops to produce flowers consistently in cultivation.
4. Lithops Care

Proper care is essential for the health and longevity of lithops species. These plants thrive in well-draining soil and require plenty of sunlight. However, they should be protected from intense midday sun to prevent sunburn. Overwatering is a common cause of lithops’ death, as they are adapted to arid conditions and prefer to stay slightly dry. It is best to water lithops sparingly, allowing the soil to dry out completely between waterings.
5. Popular Lithops Species
Some popular lithops species among enthusiasts include Lithops aucampiae, Lithops karasmontana, Lithops optica, Lithops salicola, and Lithops verruculosa. Each species has its own unique characteristics and can make a fascinating addition to a succulent collection.
6. Collecting Lithops Seeds
If you are interested in growing lithops from seeds, it is essential to collect them properly. Wait until the seed capsules split open naturally before collecting the seeds. Ensure that the seeds are fully mature before harvesting them. Properly storing the seeds in a cool and dry place will help maintain their viability.
7. Propagating Lithops
Propagating lithops can be a rewarding experience. Besides growing from seeds, lithops can also be propagated through division. Gently separate the offsets from the parent plant and allow them to callous before planting them in a well-draining soil mix. Patience is key when propagating lithops, as they are slow-growing plants.
Conclusion
The world of lithops species is full of fascination and wonder. These remarkable succulent plants have evolved unique characteristics to survive in harsh environments, and their stunning colors and patterns make them sought after by collectors and enthusiasts. With proper care and understanding, you can enjoy the beauty and intricacies of lithops species in your own home.
Growing Lithops from Seeds: Step-by-Step Guide
Starting your lithops journey from seeds can be an exciting and rewarding experience. Follow these steps to successfully grow lithops from seeds:
- Obtain lithops seeds: Purchase lithops seeds from a reputable supplier or collect seeds from mature lithops plants.
- Prepare your materials: Gather the following materials: a well-draining potting mix, a shallow seed tray or pot, a small spray bottle, and a clear plastic cover or plastic wrap.
- Prepare the potting mix: Create a mixture of 50% coarse sand, 30% perlite, and 20% well-draining organic matter, such as peat moss.
- Sow the seeds: Fill the seed tray or pot with the prepared potting mix. Spread the lithops seeds evenly on the surface of the soil, ensuring that they are not buried too deep.
- Mist the seeds: Use the small spray bottle to mist the seeds gently with water. Ensure that the soil is moist, but not overly wet.
- Cover the seeds: Place the clear plastic cover or plastic wrap over the seed tray or pot to create a humid environment. This will help with germination.
- Provide the right conditions: Place the seed tray or pot in a warm and bright location, such as a sunny window sill. Maintain a temperature of around 70-80°F (21-27°C).
- Ensure proper ventilation: Lift the cover or wrap occasionally to provide fresh air circulation and prevent fungal growth. Mist the seeds if the soil starts to dry out.
- Be patient: Germination can take anywhere from a few days to several weeks, so be patient and continue to provide the necessary care.
- Transplant the seedlings: Once the lithops seedlings have grown their first set of true leaves and are large enough to handle, carefully transplant them into individual pots with a similar potting mix as before.
- Continue care: Provide proper care to your lithops seedlings, including bright light, well-draining soil, and occasional watering. As they grow, be mindful of their watering needs and follow the specific care instructions for the lithops species you are growing.
By following these steps, you can successfully grow lithops from seeds and enjoy the unique beauty of these fascinating plants.
Essential Care Tips for Healthy Lithops
Growing lithops, also known as living stones, requires specific care to ensure their health and longevity. These unique and fascinating plants have specific needs that must be met in order for them to thrive. Here are some essential care tips for keeping your lithops healthy:
Light:
Lithops need bright light to grow properly. They should be placed in a location where they receive direct sunlight for at least 4-6 hours a day. However, it’s important to avoid intense afternoon sunlight, as this can cause the plants to overheat and burn.
Watering:
One of the most important aspects of lithops care is proper watering. These plants are adapted to survive in arid environments and have unique watering needs. It’s crucial to avoid overwatering, as this can cause root rot and ultimately kill the plants. Lithops should be watered sparingly, and the soil should be allowed to dry completely between waterings. It’s better to underwater lithops than to overwater them.
Soil and Potting:

Lithops prefer a well-draining soil mix that replicates the conditions of their natural habitat. A mix of regular potting soil and coarse sand or perlite works well. The potting container should have drainage holes to prevent water from accumulating around the roots. It’s best to plant lithops in a shallow container, as their roots are shallow and wide-spreading.
Temperature and Humidity:
Lithops thrive in warm temperatures, ideally between 70-80 degrees Fahrenheit (21-27 degrees Celsius) during the day and 50-60 degrees Fahrenheit (10-16 degrees Celsius) at night. They prefer low humidity levels, closer to the arid conditions of their native habitats. It’s important to provide good airflow around the plants to prevent excess moisture buildup.
Fertilizing:
While lithops don’t require frequent fertilization, a small amount of diluted fertilizer can be beneficial during the growing season. A balanced, low-nitrogen fertilizer can be applied once a month. It’s important to follow package instructions and avoid overfertilizing, as this can harm the plants.
Propagation:
Lithops can be propagated through seeds or by separation of the offsets, also known as “pups.” If propagating through seeds, it’s important to sow them in a well-draining soil mix and provide the right conditions for germination. Separating the offsets can be done gently by removing them from the parent plant and allowing them to establish their own root system before planting.
Pests and Diseases:
Lithops are generally resistant to pests and diseases, but they can still be susceptible to mealybugs, aphids, and fungal infections. Regularly inspect the plants for any signs of infestation or disease, and take necessary measures to treat them. It’s important to address any issues promptly to prevent them from spreading to other plants.
Following these essential care tips will help ensure that your lithops thrive and remain healthy. With the right care, these unique and fascinating plants can bring joy and beauty to your indoor or outdoor garden.
Common Diseases and Pests: How to Protect Your Lithops
Lithops are generally hardy plants, but they can still be susceptible to a few common diseases and pests. By taking proper care and being vigilant, you can protect your lithops from these issues and keep them healthy.
Diseases
While lithops are known for their ability to withstand tough conditions, they can still fall victim to certain diseases. Here are a few common diseases that can affect lithops:
- Root rot: Overwatering or poor drainage can lead to root rot, which can cause the roots to decay and the plant to become weak or die. To prevent root rot, make sure to use well-draining soil and allow it to dry between waterings.
- Fungal diseases: Fungal diseases, such as powdery mildew or leaf spot, can occur in humid conditions or if the plant is overcrowded. To prevent fungal diseases, provide good air circulation and avoid overhead watering.
- Viral diseases: Viral diseases can lead to discoloration, deformities, or stunted growth in lithops. Unfortunately, there are no cures for viral diseases, so it is best to remove and destroy infected plants to prevent the spread.
Pests

Lithops can also face pest infestations, which can weaken or kill the plant if left untreated. Here are a few common pests that can affect lithops:
- Mealybugs: Mealybugs are small, soft-bodied insects that feed on the sap of lithops. They appear as cottony masses on the plant’s leaves or stems. To get rid of mealybugs, you can spray the plants with a mixture of water and soap or use insecticidal soap.
- Aphids: Aphids are tiny, pear-shaped insects that can infest the leaves and stems of lithops. They can be green, black, or brown in color. To control aphids, you can use insecticidal soap or neem oil.
- Spider mites: Spider mites are small pests that are difficult to see with the naked eye. They can cause yellow spots, webbing, and leaf drop on lithops. To control spider mites, you can wash the plant with water or use insecticidal soap.
Preventing Diseases and Pests
Prevention is always better than treatment when it comes to diseases and pests. Here are a few tips to prevent diseases and pests from affecting your lithops:
- Provide proper care: Follow the care instructions for lithops, including providing adequate light, using well-draining soil, and avoiding overwatering.
- Inspect regularly: Regularly check your lithops for any signs of diseases or pests. Catching and treating issues early can help prevent them from spreading.
- Isolate infected plants: If you notice a lithops with signs of disease, promptly remove it from other healthy plants to prevent the spread of the disease.
- Maintain cleanliness: Keep your gardening tools and pots clean to avoid spreading diseases or pests to your lithops.
By following these tips and being proactive in caring for your lithops, you can minimize the risk of diseases and pests and enjoy healthy, thriving plants.
Propagation Techniques: Multiplying Your Lithops Collection
If you are a lithops enthusiast and would like to expand your collection, there are several propagation techniques you can use. Here, we will cover some of the most common methods for multiplying your lithops.
1. Leaf Cuttings
Leaf cuttings are one of the easiest ways to propagate lithops. To do this, carefully remove a healthy leaf from the parent plant, making sure to include the entire leaf and its base. Allow the leaf cutting to dry for a few days, then place it on well-draining soil. Keep the soil slightly moist and provide indirect light. After a few weeks, roots will start to develop, followed by the growth of a new lithops plant from the base of the leaf. Once the new plant has developed its own roots, it can be transplanted into its own pot.
2. Division
Division is another effective method for multiplying your lithops. This technique involves separating the offsets or “pups” that have developed around the main plant. Gently remove the pups from the parent plant, making sure to keep the roots intact. Allow the cut ends to dry for a few days, then plant each pup in its own pot with well-draining soil. Water sparingly and provide bright, indirect light. The pups will develop their own roots and grow into individual lithops plants.
3. Seed Propagation
For those who are patient and enjoy starting plants from seeds, lithops can also be propagated through seed germination. Collect ripe seeds from the parent plant and ensure they are fully dry before sowing. Prepare a well-draining soil mix and sow the seeds on the surface. Lightly press the seeds into the soil, but do not cover them as they require light for germination. Mist the soil lightly to moisten it and cover the pot with a plastic bag or dome to create a humid environment. Place the pot in a warm spot with indirect light. Germination can take several weeks to months, so be patient. Once the seedlings have developed a few pairs of leaves, they can be transplanted into individual pots.
Remember to label each individual plant when propagating through leaf cuttings, division, or seed propagation, as each lithops may have unique characteristics and growth patterns. With proper care and patience, you can exponentially grow your lithops collection and enjoy the fascinating beauty of these unique plants.
Creative Display Ideas for Showcasing Lithops
- 1. Glass Terrariums: Create a mini desert in a glass terrarium by arranging different species of Lithops together. This allows you to showcase their unique shapes and colors in a contained and visually appealing way.
- 2. Succulent Gardens: Incorporate Lithops into larger succulent gardens or arrangements to create a stunning display. Combine them with other low-water plants like Echeveria and Haworthia for a contrasting texture and color.
- 3. Minimalist Pots: Show off the simplicity and beauty of Lithops by planting them in simple and sleek pots. Choose pots with neutral colors like white, gray, or black to let the colors of the Lithops be the main focus.
- 4. Rock Gardens: Create a small rock garden specifically for Lithops by arranging different types of rocks or pebbles in a shallow dish or tray. Plant the Lithops so that only the top of the plant is visible, mimicking their natural habitat.
- 5. Miniature Landscapes: Get creative and create miniature landscapes using small figurines, mini houses, and tiny props. Place the Lithops among these miniatures to create a whimsical and enchanting display.
- 6. Vertical Gardens: Use vertical garden systems or hanging planters to grow Lithops. This not only saves space but also creates an interesting and unique way to display these fascinating plants.
Remember, when displaying Lithops, it is important to provide them with the proper growing conditions and care. Make sure they receive adequate sunlight, well-draining soil, and infrequent watering to mimic their natural desert environment.
Frequently Asked Questions about Lithops
1. What are Lithops?
Lithops, also known as living stones, are succulent plants native to South Africa. They belong to the Aizoaceae family and are known for their unusual appearance that resembles small stones or pebbles.
2. How do I grow Lithops from seeds?
- Start by soaking the seeds in warm water for 24 hours to soften the seed coat.
- Prepare a well-draining potting mix by combining equal parts of sand, perlite, and peat moss.
- Sow the seeds on the surface of the potting mix and lightly cover them with a thin layer of sand.
- Place the pot in a warm and bright location, but avoid direct sunlight.
- Water the seeds sparingly, making sure not to overwater as it can cause rot.
- Germination can take anywhere from a few days to several weeks.
3. How often should I water Lithops?
Lithops have a unique growth cycle and require different watering practices. During their active growth in spring and autumn, they should be watered sparingly, allowing the soil to dry out completely between waterings. In summer and winter, when they are in a dormant state, they require even less water and can survive for months without any irrigation.
4. Can Lithops thrive in low light conditions?
Lithops prefer bright light conditions and will not thrive in low light environments. It is recommended to place them near a south-facing window or under grow lights to ensure they receive sufficient light for healthy growth. Avoid exposing them to direct sunlight in hot summer months, as it can cause sunburn.
5. What are the common problems and diseases that affect Lithops?
Some common problems that can affect Lithops include overwatering, which can cause root rot, and mealybugs, which can infest the plants. To prevent these issues, it is important to ensure proper watering practices and regularly inspect the plants for any signs of pests. If detected, the affected plants should be treated with appropriate insecticides or fungicides.
6. Can Lithops be propagated through division?
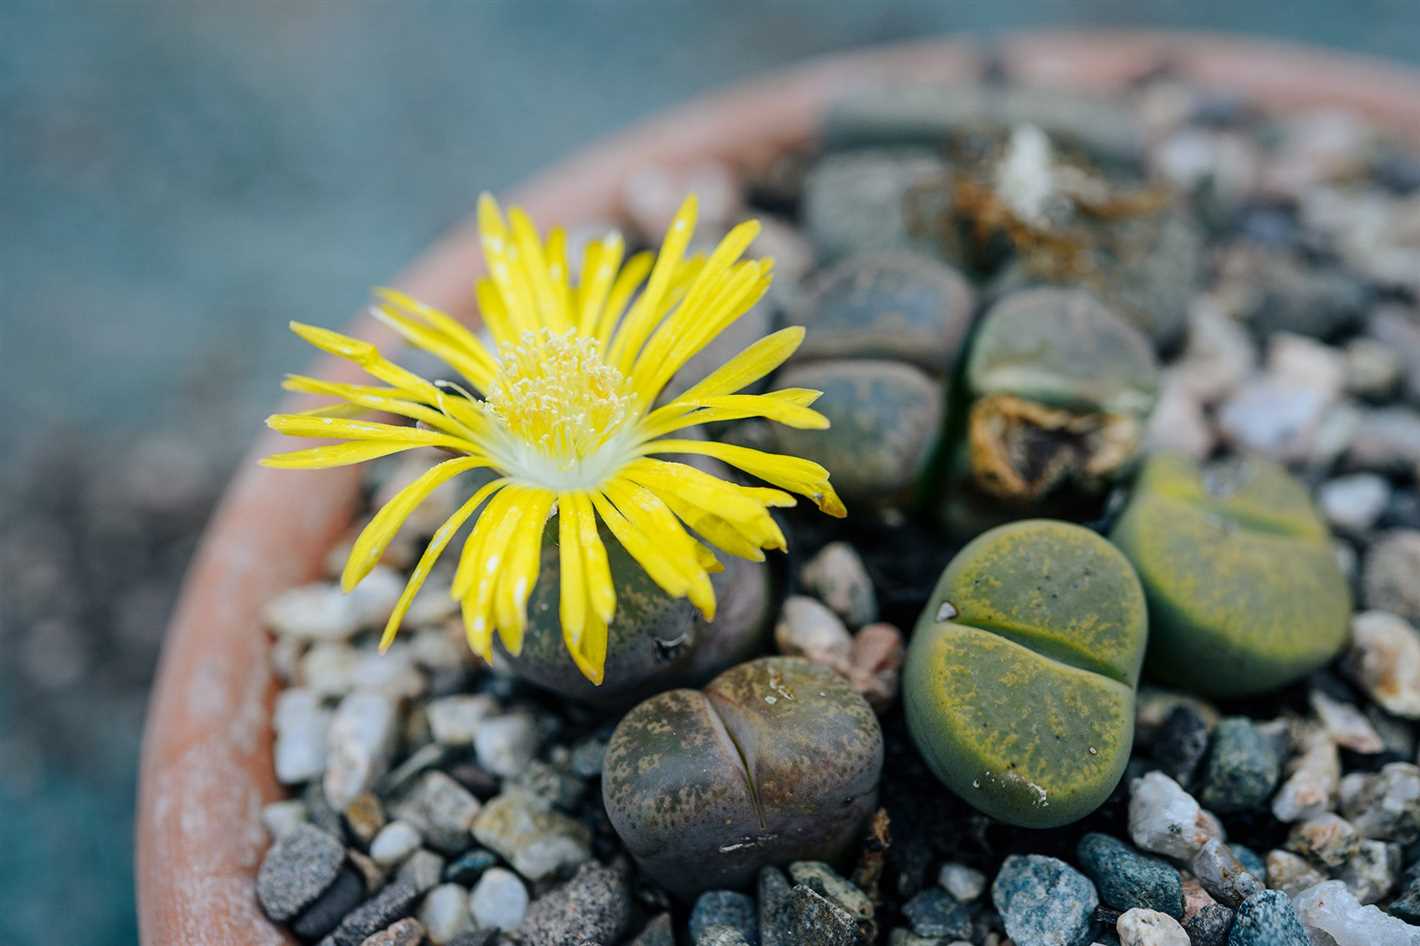
Yes, Lithops can be propagated through division. This is typically done during the spring or summer months when the plant is actively growing. Gently remove the plant from its pot and carefully separate the different individuals. Allow the divided plants to dry for a few days before replanting them in their individual pots.
7. How long do Lithops usually live?
Lithops have an average lifespan of 10 to 15 years, but some species can live up to 50 years or more with proper care. Their longevity largely depends on the growing conditions, as well as how well they are maintained and protected from diseases and pests.
8. Are Lithops toxic to pets?
Lithops are not known to be toxic to pets. However, it is always a good practice to keep plants out of reach of curious pets to prevent any potential ingestion or accidental damage.
9. Are there different species and varieties of Lithops?
Yes, there are numerous species and varieties of Lithops available, each with unique colors and patterns. Some popular species include Lithops fulviceps, Lithops lesliei, and Lithops verruculosa. Collecting different species and varieties is a popular hobby among succulent enthusiasts.
10. Can Lithops be grown outdoors?
Lithops can be grown outdoors in regions with a warm and dry climate. They prefer a well-draining soil and can be planted in rock gardens or containers. It is important to protect them from excessive rainfall and cold winter temperatures, as these conditions can be detrimental to their health.
Q&A:
How do I grow Lithops from seeds?
To grow Lithops from seeds, start by soaking the seeds in water for 24 hours. Then, prepare a well-draining soil mix and sow the seeds on the surface. Water lightly and cover the container with a lid or plastic wrap to create a humid environment. Place the container in a bright location, but avoid direct sunlight. Keep the soil moist but not wet. The seeds will germinate in 1-3 weeks.
What kind of soil mix should I use for Lithops?
Lithops prefer a well-draining soil mix that is sandy or gritty. A recommended mix is a combination of equal parts sand, perlite, and potting soil. This will ensure good drainage and prevent the roots from sitting in wet soil. Avoid using regular potting soil as it retains too much moisture and may cause the roots to rot.
How often should I water Lithops?
Lithops have a unique watering requirement and should be watered sparingly. During their active growth period, which is typically in autumn and spring, water them thoroughly when the soil is completely dry. However, during their dormant period in summer and winter, they should be kept completely dry to mimic their natural environment.
Can I grow Lithops in direct sunlight?
No, Lithops should not be exposed to direct sunlight. They require bright light, but direct sunlight can cause their leaves to burn. It is best to place them in a location with bright indirect light, such as near a window with sheer curtains or in a shaded area outside.
How do I propagate Lithops?
Lithops can be propagated through division or by separating the offsets. To divide a mature Lithops plant, carefully remove it from the soil and gently separate the two sections. Allow the divisions to dry for a few days before planting them in their own containers. To separate offsets, gently twist them off the parent plant and plant them in their own containers. Both methods should be done during their active growth period.
What are the different species of Lithops?
There are numerous species and varieties of Lithops, each with its own unique characteristics. Some popular species include Lithops aucampiae, Lithops lesliei, Lithops optica, and Lithops pseudotruncatella. These species vary in color, size, and patterns on their leaves. It is important to research and choose the species that best suits your preferences and growing conditions.
Do Lithops require any special care?
Yes, Lithops have specific care requirements to thrive. They require a well-draining soil, bright indirect light, and sparing watering. It is important to avoid overwatering as this can cause the roots to rot. Additionally, they should be protected from extreme temperatures and not exposed to direct sunlight. Following these care instructions will help ensure the health and longevity of your Lithops plants.
Video:
How to GROW and CARE for LITHOPS | Growing Succulents with LizK
