- Violets Care Guide: Healthy Plants Maintenance
- Introduction
- Light
- Watering
- Humidity
- Fertilizing
- Potting and Repotting
- Pruning
- Pest and Disease Control
- Conclusion
- Choosing the Right Soil
- 1. pH Level:
- 2. Soil Texture:
- 3. Nutrient Content:
- 4. Moisture Retention:
- 5. Soil Sterility:
- Watering Techniques for Violet Plants
- 1. Choose the Right Potting Mix
- 2. Watering Frequency
- 3. Watering Techniques
- 4. Signs of Underwatering and Overwatering
- 5. Watering Schedule
- 6. Adjusting Watering Based on Season
- 7. Use Room Temperature Water
- Light Requirements and Placement
- Fertilization Tips for Vibrant Blooms
- 1. Choose the Right Fertilizer
- 2. Follow the Recommended Application Rate
- 3. Feed Violets Regularly
- 4. Water Properly After Fertilizing
- 5. Use Organic Fertilizers (Optional)
- 6. Monitor and Adjust Fertilization
- 7. Avoid Fertilizing Newly Potted Violets
- Controlling Humidity:
- Pruning and Pinching Methods
- Prompt Deadheading
- Pinching Off Spent Blooms
- Trimming Overgrown Violets
- Trimming Long Runners
- Disinfecting Tools
- Common Pests and Diseases:
- Pests:
- Diseases:
- Propagation Techniques for Expanding Your Collection
- 1. Leaf Cutting
- 2. Division
- 3. Suckers
- 4. Tissue Culture
- Conclusion
- Q&A:
- How often should I water my violets?
- What kind of light do violets need?
- How often should I fertilize my violets?
- Can I propagate violets from cuttings?
- What should I do if my violet’s leaves are turning yellow?
- Do violets need to be repotted?
- How do I control pests on my violets?
- Video: African Violet Care~Best Tips For Healthy Indoor Plants
Known for their delicate beauty and captivating fragrance, violets are a popular choice among gardeners. Whether you’re a seasoned gardener or just starting out, these lovely plants can add a touch of elegance to any space. However, like all plants, they require proper care and attention to thrive. In this article, we will explore some essential tips for caring for violets and how to propagate them for healthy, vibrant plants.
Caring for violets:
Violets require a moist but well-draining soil to thrive. When planting, it is crucial to choose a soil mix specifically formulated for violets or use a combination of regular potting soil, peat moss, and perlite. This will enable the proper drainage essential for the health of the plant.
Tip: A good rule of thumb is to keep the soil consistently moist, but be careful not to overwater, as this can lead to root rot.
Additionally, violets prefer bright but indirect light. Placing them near a north-facing window or providing filtered sunlight is ideal. Avoid placing them in direct sunlight as this can scorch the leaves and hinder growth.
Tip: If you notice your violets reaching towards the light source, rotate them regularly to ensure even growth.
Proper fertilization is also crucial for the health of violets. Use a balanced liquid fertilizer diluted to half strength, applying it every two to four weeks during the growing season. Be sure to follow the package instructions for the best results.
Propagation tips:
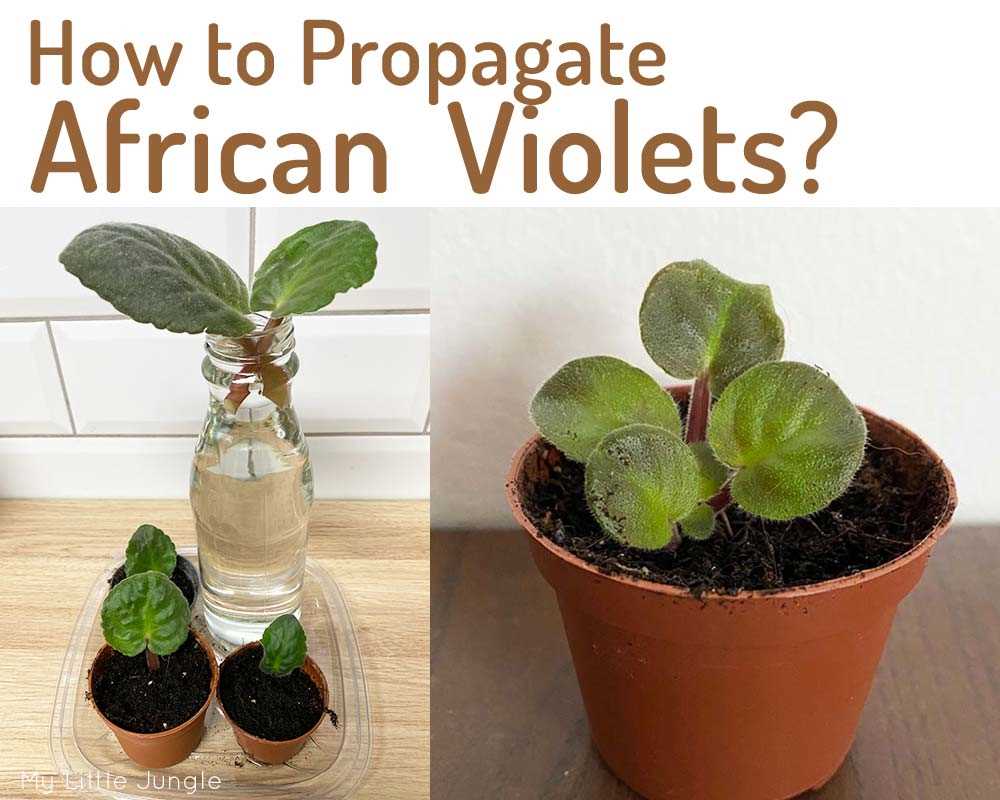
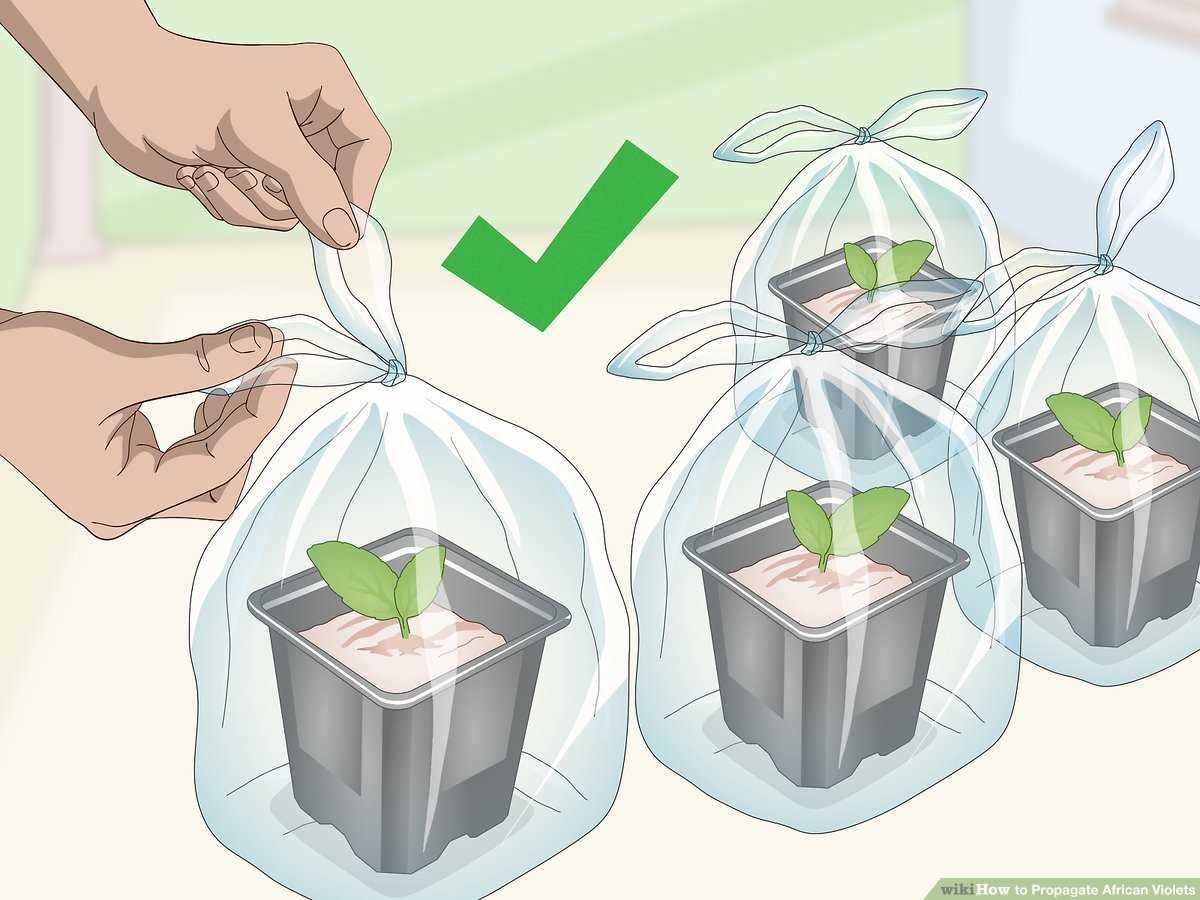
Propagating violets can be a rewarding way to expand your collection. The most common method of propagation is through leaf cuttings. Choose a healthy leaf with no signs of disease or damage and gently remove it from the plant, cutting it close to the base. Plant the leaf in a small pot with moistened soil mix and cover it with a plastic bag or a glass jar to create a humid environment. Place the pot in a warm and bright location, but out of direct sunlight. Within a few weeks, you should see new plantlets emerging from the leaf.
Another method of propagation is by dividing the plant. This is best done in early spring when the plant is actively growing. Gently remove the plant from its pot and divide it into smaller sections, ensuring each section has roots attached. Replant the divided sections in individual pots with fresh soil, and water thoroughly.
Tip: It’s important to keep in mind that violets may take some time to establish themselves after propagation. Be patient and provide them with the necessary care to ensure their success.
By following these care and propagation tips, you can enjoy a beautiful collection of healthy violets that will bring joy and beauty to your home or garden.
Violets Care Guide: Healthy Plants Maintenance
Introduction
Violets are beautiful plants that are known for their delicate flowers and lush green leaves. With the right care and maintenance, violets can thrive and continue to bloom for years to come. In this guide, we will provide you with tips on how to care for your violets and keep them healthy.
Light
Violets prefer bright, indirect light. Too much direct sunlight can scorch their leaves, while too little light can prevent proper blooming. Place your violets in a location that receives bright, filtered light for several hours a day.
Watering
Proper watering is crucial for the health of your violets. Water them thoroughly when the top inch of soil feels dry to the touch. Avoid overwatering as it can lead to root rot. It’s a good practice to use room temperature water and water the soil directly, avoiding the leaves.
Humidity
Violets prefer a humid environment, so it’s important to provide them with enough moisture in the air. You can increase humidity by placing a tray filled with water near your plants or using a humidifier.
Fertilizing
Violets benefit from regular feeding. Use a balanced violet fertilizer according to the instructions on the package. Over-fertilizing can damage the plants, so it’s essential to follow the recommended dosage.
Potting and Repotting
Violets prefer to be slightly pot-bound, so avoid potting them in containers that are too large. When repotting, choose a pot that is one size larger than the current one and use well-draining soil. Repotting is typically done once a year.
Pruning
Regular pruning helps to maintain the shape and health of your violets. Trim off any yellow or dead leaves and remove spent flowers to encourage new blooms.
Pest and Disease Control
Inspect your violets regularly for signs of pests such as aphids, spider mites, or mealybugs. If detected, treat with an appropriate insecticide or remove the pests manually. Avoid overwatering and provide good air circulation to prevent fungal diseases.
Conclusion
With proper care and maintenance, your violets can thrive and provide you with beautiful blooms for years. Remember to provide them with adequate light, water them correctly, maintain proper humidity, and fertilize them regularly. Prune and repot as needed, and keep an eye out for pests and diseases. Following these tips will help you keep your violets healthy and vibrant.
Choosing the Right Soil
Choosing the right soil is crucial for the health and growth of violets. Violets prefer a well-draining soil that is rich in organic matter. Here are some factors to consider when choosing soil for your violets:
1. pH Level:
Violets prefer a slightly acidic soil, with a pH level between 6.0 and 7.0. It’s important to test the pH level of the soil before planting your violets. You can use a pH testing kit to determine the acidity or alkalinity of the soil.
2. Soil Texture:
The soil should have a loose and crumbly texture to ensure good drainage. A soil that is too compacted can lead to waterlogged roots and root rot. You can improve the soil texture by adding organic matter such as peat moss, compost, or well-rotted manure.
3. Nutrient Content:
Violets require a soil that is rich in nutrients. Organic matter, such as compost or well-rotted manure, can help provide the necessary nutrients. Additionally, you can apply a balanced fertilizer specifically formulated for violets to ensure they receive the right amount of nutrients.
4. Moisture Retention:
While violets prefer well-draining soil, it’s important to choose a soil that can retain some moisture. A soil that is too sandy or does not retain enough moisture can lead to drought stress in violets. Adding organic matter to the soil can help improve moisture retention.
5. Soil Sterility:
It’s important to ensure that the soil you choose for your violets is sterile and free from pests and diseases. Using sterilized potting mix or pasteurized soil can help prevent the introduction of harmful pathogens to the plants.
By considering these factors and choosing the right soil, you can provide your violets with a healthy growing environment that will promote their growth and flowering.
Watering Techniques for Violet Plants
1. Choose the Right Potting Mix
The choice of potting mix is crucial for proper watering of violet plants. Use a well-draining potting mix that includes ingredients like peat moss, perlite, and vermiculite. This ensures that excess water drains out easily, preventing root rot.
2. Watering Frequency
Violet plants require consistent moisture, but overwatering can be detrimental. It’s important to strike the right balance. Water your violets thoroughly when the top inch of soil feels dry to the touch. Avoid letting the plants sit in water for long periods, as this can lead to root rot.
3. Watering Techniques
There are a few techniques you can use to water your violet plants effectively:
- Bottom watering: This involves placing the pot in a shallow dish filled with water. Allow the plant to soak up the water through the drainage holes until the soil is adequately moist. Remove any excess water after about 30 minutes.
- Misting: Violets enjoy high humidity, so misting the leaves with water can help create a suitable environment. However, avoid getting water on the flowers, as this can cause damage.
- Using a watering can: A gentle stream of water from a watering can or a narrow-spouted watering bottle can be used to water the soil directly. Pour the water evenly across the surface, making sure not to disturb the leaves.
4. Signs of Underwatering and Overwatering
It’s important to monitor your violet plants for signs of underwatering or overwatering:
- Underwatering: Symptoms include wilting leaves, dry soil, and slower growth.
- Overwatering: Look for signs like yellowing leaves, root rot, and a musty smell. If the soil feels constantly wet and the roots look brown and mushy, it’s a sign of overwatering.
5. Watering Schedule
Establish a regular watering schedule for your violet plants to maintain consistent moisture levels. This will depend on various factors such as the pot size, potting mix, humidity levels, and the specific needs of your plants. Generally, watering once or twice a week should be sufficient.
6. Adjusting Watering Based on Season
During warmer months or if your violet plants are in direct sunlight, they may require more frequent watering to compensate for increased evaporation. Conversely, reduce watering during colder months or if your plants are in a cooler area to avoid potential root damage. Monitor the soil moisture and adjust watering accordingly.
7. Use Room Temperature Water
Avoid using cold or hot water when watering your violet plants, as extreme temperatures can shock the roots. Instead, use room temperature water to keep the plants healthy and thriving.
By following these watering techniques, you can help ensure the health and vitality of your violet plants, promoting vibrant foliage and beautiful blooms.
Light Requirements and Placement
Violets require bright, indirect light to thrive. They do best in a location that receives 4-6 hours of filtered sunlight per day. Direct sunlight can scorch their leaves, so it is important to provide some shade or use sheer curtains to filter the light.
When it comes to placement, violets can be kept indoors or outdoors. If placed indoors, it is best to put them near a south-facing window where they can receive the most sunlight. East or west-facing windows can also work, as long as the plant gets enough light.
If you choose to grow violets outdoors, make sure to find a spot that offers bright, indirect light for most of the day. Avoid placing them in areas with intense afternoon sun, as this can cause leaf burn.
If you don’t have an ideal location for your violets, you can also use artificial grow lights to provide the required amount of light. These lights should be placed about 6-12 inches above the plants and kept on for 12-16 hours per day.
Remember, proper placement and lighting are crucial for the health and blooming of your violets. With the right amount of light, these beautiful plants will reward you with abundant flowers.
Fertilization Tips for Vibrant Blooms
Fertilizing violets is an essential part of their care routine. It provides the necessary nutrients to support healthy growth and vibrant blooms. Here are some tips to ensure your violets receive the right amount of nutrients:
1. Choose the Right Fertilizer
When selecting a fertilizer for your violets, opt for a balanced formula with equal amounts of nitrogen (N), phosphorus (P), and potassium (K). A ratio of 10-10-10 or 14-14-14 works well for most violets. You can also choose a fertilizer specifically formulated for violets.
2. Follow the Recommended Application Rate
Read the instructions on the fertilizer package carefully and follow the recommended application rate. Applying too much fertilizer can damage the delicate roots of violets. Remember, it’s better to under-fertilize than to over-fertilize.
3. Feed Violets Regularly
Violets benefit from regular feeding during their active growth period, which is typically during spring and summer. Feed your violets with a diluted fertilizer solution every two to four weeks. Avoid fertilizing during the winter dormancy period.
4. Water Properly After Fertilizing
After applying fertilizer, make sure to water your violets thoroughly. This helps to distribute the nutrients throughout the root system and prevents fertilizer burn. Allow the excess water to drain out of the pot to avoid waterlogging.
5. Use Organic Fertilizers (Optional)
If you prefer organic options, you can use organic fertilizers such as compost or worm castings. These natural alternatives can provide nutrients to your violets while improving soil health.
6. Monitor and Adjust Fertilization
Keep an eye on your violets’ overall health and growth. If they appear weak or if their leaves turn yellow, it may be a sign of nutrient deficiency. In such cases, adjust the fertilization routine by either increasing the frequency or switching to a more potent fertilizer.
7. Avoid Fertilizing Newly Potted Violets
When repotting or transplanting violets, avoid fertilizing them for the first two to four weeks. This allows them to adjust to their new environment without the risk of fertilizer stress.
By following these fertilization tips, you can ensure your violets receive the nutrients they need for vibrant blooms and healthy growth.
Controlling Humidity:
Humidity plays a crucial role in the health and growth of violets. These plants prefer a moderate to high humidity level, typically around 50-60%. To ensure the proper humidity level, you can follow these tips:
- Misting: Regularly misting the air around the violets can help increase humidity. Use a spray bottle filled with room temperature water and gently mist the leaves and surrounding air. Avoid directly spraying the flowers to prevent damage.
- Water Trays: Placing water-filled trays near the violets can also help increase humidity. The water will slowly evaporate, adding moisture to the air. Make sure to keep the water level in the trays consistent to maintain a constant humidity level.
- Humidifiers: If you live in a dry climate or struggle to maintain the desired humidity level, using a humidifier is a good option. Choose a humidifier that can cover the size of your growing area and set it to the desired humidity level. Regularly check and refill the humidifier as needed.
- Grouping Plants: Grouping violets together can create a microclimate with higher humidity. As plants transpire and release moisture through their leaves, the air around them becomes more humid. Arrange the pots closely together, but make sure they have enough space to allow air circulation.
Monitoring the humidity level is crucial to ensure the well-being of your violets. Low humidity can lead to leaf browning, while high humidity can cause fungal diseases. Using a hygrometer can help you keep track of the humidity levels and make adjustments accordingly.
By controlling humidity effectively, you can provide the ideal environment for your violets to thrive and grow beautifully.
Pruning and Pinching Methods
Pruning and pinching are essential techniques for maintaining the health and appearance of your violets. These methods help control the growth of the plant, encourage bushier growth, and promote more blooms. Here are some pruning and pinching methods you can follow:
Prompt Deadheading
Deadheading refers to the removal of spent blossoms from the plant. Prompt deadheading not only keeps the plant looking tidy but also redirects the plant’s energy toward new growth and flower production. Simply use a pair of clean scissors or pruners to remove the blossoms as soon as they start to fade.
Pinching Off Spent Blooms
Pinching off spent blooms is another way to promote continuous flowering. Instead of removing just the faded blossoms, pinch off the entire stem just above a set of healthy leaves. This method encourages branching and results in a bushier plant with more blooms.
Trimming Overgrown Violets
If your violets become leggy or overgrown, a more drastic pruning may be necessary. Trim back the entire plant to about one-third of its original size, cutting just above a set of leaves or a leaf node. This method stimulates new growth and helps rejuvenate the plant.
Trimming Long Runners
Violets can sometimes produce long runners that extend beyond the main plant. These runners can be trimmed back to maintain a compact and well-shaped plant. Use clean scissors or pruners to trim the runners back to where they emerge from the main plant.
Disinfecting Tools
To prevent the spread of diseases and pests, it is important to disinfect your pruning tools before and after use. Wipe down the blades with a cloth soaked in rubbing alcohol, or dip the blades in a disinfecting solution such as a mixture of bleach and water. This simple step helps protect your violets from potential infections.
Remember to always use sharp, clean tools when pruning or pinching your violets. This ensures clean cuts and minimizes damage to the plant. Regular pruning and pinching will keep your violets healthy, vibrant, and blooming throughout the growing season.
Common Pests and Diseases:
While violets are generally hardy and resistant to pests and diseases, there are a few common issues that you may encounter when caring for these plants. It’s important to identify and address these problems early to ensure the health and vitality of your violets.
Pests:
- Aphids: These small insects feed on the sap of violet plants, usually found on the undersides of leaves. They can cause stunted growth and yellowing of leaves. Regular inspection and the use of insecticidal soaps or horticultural oils can help control aphids.
- Spider Mites: These tiny pests are common in dry conditions and can cause stippled leaves and fine webbing on violet plants. Regularly misting the foliage and using insecticidal soaps or horticultural oils can help control spider mites.
- Mealybugs: Mealybugs are soft-bodied insects that form cottony masses on violet plants. They suck sap from the leaves and stems, causing wilting and yellowing. Wiping them off with cotton swabs dipped in rubbing alcohol or using insecticidal soaps can help control mealybugs.
Diseases:
- Root Rot: Overwatering or poorly drained soil can lead to root rot in violet plants. This fungal disease causes the roots to become mushy and discolored. To prevent root rot, make sure the soil is well-drained and avoid overwatering.
- Powdery Mildew: Powdery mildew appears as a white, powdery coating on the leaves and stems of violets. It is caused by fungal spores and can inhibit plant growth. Removing infected leaves and improving air circulation can help control powdery mildew.
- Leaf Spot: Leaf spot is a common fungal disease that affects violets. It causes dark spots on the leaves and can lead to defoliation if left untreated. Regularly removing infected leaves and improving air circulation can help control leaf spot.
By monitoring your violets regularly and addressing any pest or disease issues promptly, you can keep your plants healthy and thriving for years to come.
Propagation Techniques for Expanding Your Collection
Expanding your collection of violets can be an exciting and rewarding experience. While you can purchase new plants, propagating your own violets allows you to create unique varieties and share them with others. Here are a few propagation techniques to help you expand your collection:
1. Leaf Cutting
Leaf cutting is one of the most common methods of propagating violets. To propagate using leaf cutting:
- Select a healthy leaf from the parent plant.
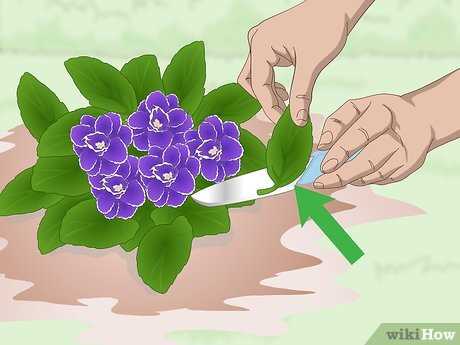
- Cut the leaf with a sharp, sterilized knife, making sure to include the petiole.
- Dip the cut end of the leaf in rooting hormone powder to promote root development.
- Plant the leaf in a small pot filled with a well-draining potting mix.
- Place the pot in a warm, bright location, but out of direct sunlight.
- Keep the soil moist, but not overly wet, and mist the leaf regularly to maintain humidity.
- After a few weeks, the leaf should develop roots and a small plantlet. Once the plantlet has a few leaves, it can be potted up individually.
2. Division
Division is another common method of propagating violets. To propagate through division:
- Carefully remove the violet plant from its pot.
- Gently separate the plant into smaller sections, making sure each section has its own roots.
- Replant each section in its own pot filled with fresh potting mix.
- Water the newly divided plants thoroughly and place them in a well-lit location.
- Continue to care for the divided plants as you would for mature violets.
3. Suckers
Suckers, also known as stolons, are offshoots that grow from the base of the plant. They can be used to propagate violets. To propagate using suckers:
- Identify a healthy sucker growing from the base of the plant.
- Using a sharp, sterilized knife, carefully cut the sucker from the parent plant.
- Plant the sucker in its own pot filled with fresh potting mix.
- Water the newly planted sucker and place it in a warm, bright location.
- Monitor the sucker for signs of new growth, which indicates successful propagation.
4. Tissue Culture
Tissue culture is a more advanced propagation technique that involves using specialized equipment to grow violets in a sterile laboratory setting. This method allows for rapid multiplication of plants and is often used by commercial growers. While it requires more technical expertise and equipment, tissue culture can result in a large number of genetically identical plants.
Conclusion
By utilizing these propagation techniques, you can expand your collection of violets and enjoy the beauty of these charming plants. Whether you choose leaf cutting, division, sucker propagation, or even try your hand at tissue culture, propagating violets is an exciting and rewarding endeavor.
Q&A:
How often should I water my violets?
Water your violets when the top inch of soil feels dry. It is important to avoid overwatering as it can lead to root rot. Make sure to use a well-draining potting mix and water thoroughly, allowing any excess water to drain away.
What kind of light do violets need?
Violets prefer bright, indirect light. Place them in a location where they can receive bright, filtered light for most of the day. Avoid placing them in direct sunlight as it can scorch the leaves.
How often should I fertilize my violets?
Violets benefit from regular fertilization. Use a balanced, water-soluble fertilizer and dilute it according to the instructions on the packaging. Fertilize your violets every 2-4 weeks during the growing season and reduce the frequency during the winter months.
Can I propagate violets from cuttings?
Yes, violets can be easily propagated from stem cuttings. Take a healthy stem with leaves and cut it just below a node. Remove the lower leaves and place the cutting in a pot filled with a moist, well-draining potting mix. Keep the cutting in a warm and humid environment until roots develop.
What should I do if my violet’s leaves are turning yellow?
If your violet’s leaves are turning yellow, it may be a sign of overwatering or underwatering. Check the moisture level of the soil and adjust your watering routine accordingly. You should also make sure the plant is not receiving direct sunlight, as this can cause leaf discoloration.
Do violets need to be repotted?
Yes, violets should be repotted every 1-2 years to ensure healthy growth. When repotting, choose a pot that is slightly larger than the current pot and use a well-draining potting mix. Gently remove the plant from its current pot and place it in the new pot, filling in any gaps with fresh potting mix. Water thoroughly after repotting.
How do I control pests on my violets?
If your violets are being attacked by pests such as aphids or spider mites, there are several methods of control you can try. You can use insecticidal soap or neem oil to treat the plants, making sure to follow the instructions on the packaging. Additionally, regularly inspect the plants for any signs of pests and remove any affected leaves or plants to prevent the spread of the infestation.
Video:
African Violet Care~Best Tips For Healthy Indoor Plants

